Wednesday, 17 February 2021
Guest Post - Podcasting - Why - What - How
Sunday, 27 December 2020
Recipe: Turkey (or Chicken) Bake with Mushrooms - Great for leftovers
Turkey (or Chicken) Bake with MushroomsGreat for leftovers
Greetings one and all, it's been a while hasn't it. I've been focusing on VirginiaWaytes.com for the last few months. I hope you have missed me 😁. Blessings of the Christmas season and Happy Holidays - I hope you have had a pleasant one this year, even if circumstances made it less than ideal. I return with a recipe that is great for using up all that leftover turkey and it works well with chicken leftovers as well for the rest of the year.
Serves 2-3
Ingredients
- 50g (heaped tbsp) butter
- 50g (heaped tbsp) plain flour
- 1 pint/570ml milk
- 1/2 tsp dried thyme
- 1/2 tsp dried rosemary
- salt & pepper to taste
- 6x24g packets salt n shake crisps or similar (unsalted potato chips)
- 100-150g (1-1.25cups) grated cheddar cheese
- tbsp oil for frying
- 2-3 cloves garlic minced or equiv garlic puree
- 150g (half a punnet) chestnut mushrooms
- left over turkey
Instructions
- Preheat the oven to 180C/360F.
- Shred the turkey.
- Slice the mushrooms into bite sized pieces.
- In a frying pan heat the oil. Add the garlic and then the mushrooms and cook until they have released all their water and are looking toasty, but not dried out.
- Mix the turkey and mushrooms and place in the base of an oven proof dish - should cover the bottom in a nice thick layer.
- Melt the butter in a med saucepan.
- Add the flour and stir to make a thick paste.
- Add the milk, little by little, stirring in at each stage until all the milk is combined with the flour and butter mixture in a smooth sauce.
- Add the rosemary and thyme (I grind mine together in a pestle and mortar first because I don't like the large bits of rosemary and it helps release the flavour even more) and salt and pepper.
- Cook for a couple of minutes until it begins the thicken.
- Test for taste and add more seasoning if needed.
- Pour the white sauce over the turkey and mushrooms and mix through gently. Don't be too vigorous or the sauce may go grey because of the mushrooms - still tasty, just not as pretty. 😉
- Crush the crisps (potato chips) until they are small pieces, but not too far and place in a bowl.
- Mix the crisps and half the cheese and spread over the top of the turkey and sauce.
- Sprinkle the rest of the cheese on top of the crisps and put in the oven.
- Bake until cheese has melted and is starting to go golden - between 15-20 mins usually.
- Serve piping hot.
We had this today - still have turkey left, but it used up a good deal of it and was delicious. Just up the amounts to feed more people - I did double this today for five people and we have leftovers or the leftovers now 😂
Wednesday, 16 September 2020
Recipe: Set Chocolate Mousse #GlutenFree #EggFree
Set Chocolate Mousse
This recipe is easy, delicious and very versatile. I made it last weekend for my family and it went down very well with everyone but my mother, but she doesn't like dark choc, so not really surprising. Might want to make the milk choc version for those with a sweeter tooth. Next time I plan to add a little orange liqueur to spice it up a bit.😋
The actual recipe comes from here: The Perfect Refuge an absolutely delightful Italian cooking channel on Youtube, but I use something of a different method, so I thought I would post it. This is the vid of the original recipe, and there is a second option using eggs as well - turn on the subtitles for English.
Ingredients
- 250ml/1.05 cup cream (I used double, but I suspect single would be okay)
- 40g/ 0.4 cup cocoa
- 1 lt/4 cups milk
- 150g dark (or milk) chocolate (3/4 cup of choc chips)
- 70g/ 2/3 cup potato starch or corn flour (starch)
- 60g/ 1/4 cup sugar (only need this is using dark choc - milk has plenty of sugar)
Equipment
- 1 large mixing bowl, 1 medium one
- scales/measuring cups/measuring jug
- hand whisk
- sieve
- large saucepan
- large rectangular dessert/terrine tin
Instructions
- Put the cocoa in the large bowl and slowly add the cream bit by bit using the whisk. You will end up with a thick paste.
- Add a splash of the milk to the paste to loosen it with the whisk, then keep adding and stirring until you've added about half the milk.
- In the medium bowl mix the corn flour/potato starch with the rest of the milk and whisk together.
- Add the corn flour/milk mixture into the cocoa mixture bit by bit using the whisk, making sure it combines well.
- Sieve the liquid into the large saucepan and push through any lumps remaining in the sieve. (I had just a few little ones).
- Heat gently on the hob and break in the chocolate.
- Stir continuously while the chocolate melts, then bring the mixture to the boil.
- Boil gently for 2 mins or until the mixture has thickened (took me more like 5, but I was heating it very gently because I fear the mixture splitting).
- Line the tin with cling film (if your mould is silicon, this step may be unnecessary, but it makes like a lot easier),
- Pour in the mixture and place more cling film over the top, in contact with the mixture.
- Place the dessert in the fridge for 5-6 hours min (I did mine overnight).
Thursday, 9 July 2020
Youtube Journey Part 2 - Adobe After Effects & InDesign - My Crash Course
Youtube Journey Part 2
Adobe After Effects & InDesign
My Crash Course
- I didn't just want to film me reading things. I want part of each vid to be live action, but I remember the Disney page turning format very fondly and wanted something along those lines for the stories. Also helps with accessibility.
- I wanted a short little logo animation to segue from live action to the story.
Endeavour 1 - My Page Turning Book
- Stage 1 - Follow Tutorial Exactly
- Stage 2 - Tutorial pages turn backwards for some reason, so figure out how to make them turn forwards.
- Stage 3 - Figure out how to create page content.
Page Content
First Idea - Photoshop:
- Create a base template
- Place text
- format text
- Rinse and repeat
Next Idea - InDesign
- We can import a preformatted Word Doc and it will automatically paginate for us.
- We can export all pages as images.
Third Thought - Plain White Pages are Boring
The End Result
- Background
- Page content
- Book style
- Page turning interval
The Plan
- Format the story to be animated in Word with the correct size font (I have to play with these anyway to get them ready for reading, so it's only a tiny little step more).
- Set up an InDesign layout with the background of choice depending on story content.
- Import Word file into InDesign.
- Add any extra formatting.
- Export pages to PNG
- Import into After Effects project and set pages to have the correct content.
- Use recording to set page turn intervals.
- Add pretty background behind the book to please YouTube's algorithm.
Endeavour 2 - My Animated Logo
Friday, 3 July 2020
Free Fiction Friday - The Cop, The Vampire, and National Security by Natasha Duncan-Drake
Free Fiction Friday
The Cop, The Vampire, and National Security by Natasha Duncan-Drake
- ePub
- Mobi
- AZW3
This Month's Story
Sexy Stories 13
Josh is back at The Manor, but is he safe? There is still the magic bound inside him to deal with and there is the question of where his uncle's dark witch disappeared to and what she will do next. Danger still looms.
Wednesday, 24 June 2020
My Shiny New Youtube Channel #WriterlyWednesdays
- Story narration
- Novel excerpt narration
- Book trailers and other Wittegen Press news vids
- The about section
- A plan of attack so I can get the content prepared.
New Release Day
Wednesday, 17 June 2020
The Social Media Minefield #WriterlyWednesdays
The Social Media Minefield
Writerly Wednesdays
The Most Important Aspect of Social Media
![]() |
| Photo by Aw Creative on Unsplash |
The 3 Most Important Social Media Platforms
- Facebook - for the older demographic
- Twitter - for a wide range of demographic
- Instagram - for the young crowd
Things To Do On All Social Media
- Make sure your bio is up to date
- Make sure your contact info is up to date
- Check all links are pointing at the right places
- Video - short, sharp, easy to digest, engaging video that gets people to stop on the post.
- Images/Links - if no video go with images/gifs or links to catch people's eye
- Just liking things doesn't cut it these days - if we want to help out another Twitter user, hit the retweet - if we think it's really important, retweet with comment to up the profile.
- Add a pinned tweet to our profile - pinned tweets allow people who follow us to know what we would really like them to retweet. Whenever I follow a new person, I look for their pinned tweet and retweet it for them.
- Use images/gifs/vids in tweets - adding some form of image media to a tweet immediately makes it more eye-catching and it is much more likely to be engaging.
- Ask questions, have conversations, engage with other people.
My Twitter Follow/Unfollow Policy:
[Edit: Forgot to mention - this part is all me, not anything the lovely lady teaching us about social media said, but I did just hit 2K followers on my new Virginia account using this strategy and the retweeting pinned tweets one. It may not be suitable for other kinds of business, however.]
- Some of the people I follow are friends - they tend to be mutuals, but are whitelisted even if they aren't. I do not unfollow them.
- Some people I follow are celebrities/brands - they are whitelisted unless they do something hideous.
- Everyone I follow for business related reasons gets a 2-3 week grace period, if they do not follow me back I unfollow them - this is so I do not hit any of Twitter limits. Sometimes this ends up with a mutual follow because I follow them again at another point and it was just they missed me the first time, so it can be good housekeeping regardless of limits.
- Other reasons for unfollowing usually involve politics or some sort of -ism that was not obvious when I first checked out their account.
- We need to make sure our images are fabulous.
YouTube
Useful Tools
- Buffer - great for scheduling social media posts in advance - has a free option. I have been using this one for years and it is very, very useful.
- Linktree - allows you to have one link so everyone can find all your main links in one place. I had never heard of this, but it is apparently really useful for Instagram. Also has a free option.
- WhoUnfollowedMe - great for seeing new followers (it's easy to miss people on Twitter's interface), seeing who unfollowed, and checking who are mutuals. I have a paid plan with this because I found the free version so useful, and it is awesome.
Yesterday was New Episode Day
Tuesday, 9 June 2020
Recipe: Tangzhong Milk Bread - Delicious White Bread with a Great Shelf Life
- Use a stand mixer or specialised dough mixer if possible - I use my Kitchen Aid with the dough hook attachment. If you need to do it by hand, oil is going to be your friend, because using flour with dry out the dough too much.
- Handle the dough with oiled gloves or very oily hands.
- Handle the dough on a well oiled surface or a non-stick silicon baking sheet - my lovely sister bought me a large silicon pasty mat for Christmas last year and it is so useful for this.
|
|
Not my image - but this is what it looks like - will swap this out
when I remember to take a piccie! |
Tangzhong Milk Bread
Ingredients
- 40g Strong White Bread Flour
- 200ml/g 0.85 cups water
- 580g/ 4cups Strong White Bread Flour
- 60g/ 1/4cup sugar
- 12g/ 2 tsp salt
- 10g/ 2.5 tsp dried yeast
- 10g/ 2.5 tsp dried milk powder
- 260g / 1cup + 2 tbsp milk
- 1 large egg
- 50g/ 1/2 stick unsalted butter (room temp)
- 1 egg yolk
- milk
Instructions
- Place the flour and water into a shallow pan and heat gently, stirring all the time.
- Cook until the mixture is a thick paste.
- Transfer to a container and cover with cling film. Place in the fridge for 6hrs or over night, or place in the freezer for 30mins.
- Take out and allow to come to room temp before using.
- Add the flour, sugar, salt, yeast and milk powder to the mixer bowl making sure not to let the salt and yeast come into direct contact.
- Mix the ingredients together to ensure proper distribution.
- Warm the milk in the microwave for 30s until it is luke warm to the touch.
- Add the egg and whisk together.
- Add the wet ingredients and the tangzhong to the dry and mix on low speed until the dough is beginning to come together.
- Add the butter to the dough and continue to mix on med until combined.
- Increase the mixer speed and knead for between 5-10 mins until the gluten is developed and the dough has come away from the sides of the mixer.
- Take the dough out and form into a ball by folding the sides under. (If you try this without oiled gloves or very oiled hands it will stick to you and you will never get it into a ball - trust me, this is what happened to me the first time).
- Place in an oiled bowl, cover in cling film and allow to rise for at least 45 mins to 1 hr depending on how warm it is. The dough is ready when you can put an oiled finger into it and it holds its shape. (I do this in my Instant Pot on the yoghurt setting - proves in 45 mins then).
- Turn out onto a non-stick surface and divide into six.
- Roll each into a ball and place under cling film for 15 mins.
- Lightly oil 2 2lb (9x5'') loaf pans.
- Take each ball and roll out into an oval using a non-stick rolling pin.
- Fold the top point of the oval over the middle and press down with the heel of your hand.
- Fold the bottom up over the middle and press down with the heel of our hand.
- Take one of the non-folded edges and press over like the first roll of a swiss roll and press the edge into the main dough with finger tips so it sticks.
- Roll up and seal the edge by pinching it, so you have a mini roll the approx width of the loaf pan and 1/3 the length (looks to be a similar shape to a pain au chocolat).
- Place in one end of the loaf pan.
- Repeat 13-18 until there are three rolls in each tin next to each other.
- Cover with cling film and allow to rise in a warm spot for 30 mins, until the dough is up to the top of the loaf pans.
- Pre-heat the over to 180C/355F
- Beat together an egg yolk and a little milk to form the glaze.
- Brush the tops of the loaves gently with the glaze.
- Bake for 25 mins - they will turn a lovely deep golden brown.
- Allow to cool on a wire rack.
The Sexy Stories Podcast 10
Monday, 1 June 2020
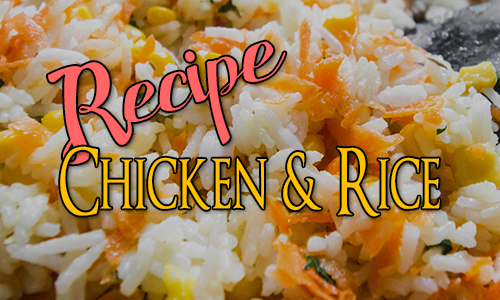
Recipe: Delicious Chicken & Rice - #InstantPot & #StoveTop Instructions
Delicious Chicken & Rice
Instant Pot or Stove Top
Ingredients
- 6 mini breast fillets (chicken tenders) cut into bite sized pieces ~300g - breast would work well too, but thighs might need a little more cooking.
- 1/2 large onion - diced very small
- 1 large carrot or 2 small ones - diced very small
- 500ml / 2 cups chicken stock (I use low sodium, but just use your favourite)
- 2 cloves garlic (crushed - I use lazy garlic and its about a tsp)
- sprinkle of Italian seasoning
- 200g/1 cup Jasmine rice (or white rice of choice)
- 2 tbsp oil
- salt and pepper to taste
- 25g/ 1/4 cup Parmesan cheese, or something similar
- fresh herbs - e.g. parsley, coriander/cilantro or basil (optional)
Instant Pot Instructions
- Turn on the Instant Pot and choose the saute setting.
- Add the oil, the onions and the carrots and saute for about 5 mins or until the onions are translucent and the carrots are beginning to go tender.
- Add the garlic and stir for about 30 sec.
- Add the chicken and stir around until the chicken is beginning to colour a little.
- Cancel the saute.
- Use a little of the chicken stock to deglaze the bottom of the pot, then add the rest.
- Add in the rice and stir gently so all the rice is covered in the stock.
- Add the Italian seasoning and salt and pepper.
- Put on the lid, make sure the valve is on sealing, choose the pressure/manual setting and set for 10mins.
- When the time is up, allow to sit for 5 mins to allow the chicken to rest.
- Release the pressure and open the pot.
- Stir the rice and make sure it hasn't stuck.
- Add the Parmesan and stir through.
- If using fresh herbs, chop them and add them now and stir through.
- Serve immediately.
Stove Top Instructions
- Add the oil to a deep stove top pan that has a tight fitting lid and heat.
- Add the chicken and cook through until almost completely done, then remove and set aside.
- Add a little more oil to the pan and add the carrots and the onions and sweat down until the onions are soft and the carrots are beginning to become tender.
- Add the glaric and fry until it become fragrant, 30-60sec
- Deglaze the pan with a little of the stock and then add the rest.
- Add in the rice and stir in.
- Add in the Italian herbs and seasoning.
- Add back in the chicken.
- Bring to the boil and cover with the lid.
- Turn down the heat and cook for 13-15 mins or until the rice is done to your liking and has absorbed nearly all the stock. Add more water if necessary, but there should be enough.
- Turn off the heat and stand for 5 mins with the lid still on.
- Stir to fluff the rice and add in the Parmesan and fresh herbs (if using) and stir through.
- Serve immediately.
Tuesday, 26 May 2020
Joys of Podcasting 2 - Learning Curve
- the podcast🎧 has a brief recap and all the naughty bits from the week's episode
- and there is also an eBook📕 with all the plot that would make the podcast far too long.
#1 Create a Podcast Trailer
-
We want out podcast approved on streaming platforms before episode 1
goes live
For example Apple takes a while to approve new podcasts - it can be anything from hours to a week - and there has to be at least one "episode" live for them to approve it. This means if we want our podcast to launch on Apple at the same time as it goes live everywhere else we need a valid episode before we actually launch. A trailer counts as a valid episode.
Most other places take less time to approve, but it is still best to have the podcast live on other platforms before launch, - A trailer gives us a chance to introduce our style and hook listeners before launch day. We're trying to interest people in our product just like movies do, so a trailer is a great idea to gather interest. If we are very lucky they might even subscribe to our podcast.
#2 Where to Get a Podcast Seen
-
Spotify
➡️Submit Your Podcast to Spotify (Live365) -
Apple Podcasts
➡️How to Submit Your Podcast to iTunes (Live365)
➡️Submitting My Podcast to Apple Podcasts (Podbean) -
Google Podcasts & Google Music Podcasts
-
➡️How to Submit Your Podcsat to Google Podcasts (Live365)/
➡️Making my podcast available in the Google podcast app (Podbean) - N.B. Google Music Podcasts (not Google Podcasts - confusing I know, but they are separate) is only available in North America, and even to submit to them we have to be in North America, so use a VPN to pretend to be in the US if you are not like me. -
Stitcher
➡️How to Submit Your Podcast to Stitcher & TuneIn (Live365) -
TuneIn
➡️How to Submit Your Podcast to Stitcher & TuneIn (Live365)