Showing posts with label *Food: Sweet. Show all posts

Sunday, 6 March 2022

Recipe: Almond Flour, Banana, Peanut Butter, Choc Chip Muffins (Gluten Free)

Recipe: Almond Flour, Banana, Peanut Butter, Choc Chip Muffins - Gluten Free

Recipe: Almond Flour, Banana, Peanut Butter, Choc Chip Muffins (Gluten Free)

This is based off another of Olena's recipes at iFoodReal - Almond Flour Muffins, but I tweaked it a bit and added in a few things, so here is my version. Her recipe is fab and no doubt healthier than mine, but I wanted to add a bit of a rounder flavour, hence the peanut butter.

These are gluten free and Olena's recipe is low carb, but I added the peanut butter, so if you are on a Keto diet you'll need to figure that in. It's not against the rules because it is moderately low in carbs, but it needs to be considered.

Ingredients

  • 3 ripe bananas - all the sweetness comes from these, so go for bananas that are going brown (buying them a week in advance and leaving them on the side is advised - just remember to buy extra for roving munchers because I almost lost mine to the hubby a couple of times ๐Ÿ˜‚)
  • 3 large eggs
  • 1 tsp vanilla extract (not essence!)
  • 1/2 tsp cinnamon
  • 1/2 tsp powdered ginger
  • 1 tsp baking soda (bicarbonate of soda)
  • 1 tsp baking powder
  • 1/4 tsp salt
  • 120g 1/2 cup natural peanut butter (I recommend Skinny Dips Hi-Oleic Smooth PB - it has an amazing flavour)
  • 300g (2 bags) 3 cups ground almonds (almond flour)
  • 200g (2 bags) 70% dark choc chips (Dr Oetker are really good - and yes this is 4x the amount Olena uses, but what can I say, I love choc chips ๐Ÿ˜‹)

Equipment

  • 12 muffin cases (2in/55mm)
  • 12 spot muffin tin or individual muffin tins
  • 1 food mixer (you can do it by hand in a bowl with a masher and a spoon, but it will take some elbow grease)
  • 1 spatula
  • 1 ice cream scoop (you can use a spoon, this just makes it easier)

Method

  1. Pre-heat the oven to  180C/350F.
  2. Place the paper muffin cases in the muffin tin. You can use cooking spray and cook the muffins directly in the tray if you wish, but I prefer them in cases to make them more portable.
  3. Add the banana, eggs, vanilla, cinnamon, ginger, bicarb, baking powder and salt into the food processor and whizz until smooth. You may have to scrape down bits of banana from the side a couple of times.
  4. Add in the peanut butter and whizz again to mix in.
  5. Add the ground almonds and process until just mixed in. You will definitely have to stop and use the spatula to scrape down the walls at least once. DO NOT OVER PROCESS.
  6. Take out the blade and scrape it off before putting it aside.
  7. Pour in the choc chips and mix through the batter with the spatula. Do this slowly or you will end up with batter all over the counter top (ask me how I know ๐Ÿ˜†).
  8. Use the ice cream scoop to portion the batter into the 12 cupcake cases. I find the best way is to put a level scoop in each and if there is a little batter left at the end, add some more to each case.
  9. Bake in the oven for 20-25 mins. I usually do them for 15 mins, then turn the tray and put them on for another 5 because they do quickly in my oven. They are done when they are golden on top and a tooth pick comes out clean.
  10. Take them out and let them cool on a wire rack for at least 20 mins. I think they are even better the next day, and they will keep in an airtight cool place for four or five days.
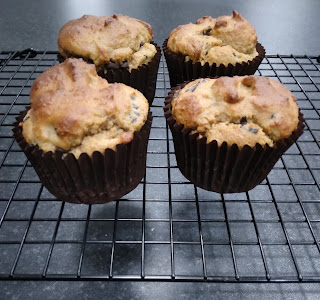
4 Almond Flour, Banana, Peanut Butter, Choc Chip Muffins on a cooling rack.


Check Out My Fiction YouTube Channel

Tales with Tasha - YouTube

Each week we have a theme and so there will be something for all tastes.
  • ๐ŸŽคMicro stories as YouTube Shorts Monday - Thursday - for fun quick viewing
  • ๐Ÿ•ฎA longer story every Friday - for story time, over coffee or before going to bed

Tasha's Social Media


๐Ÿ“šJoin My Newsletter๐Ÿ“š


Receive 2 FREE eBooks just for signing up and a free short story on the first Friday of every month on Free Fiction Friday.


Two books covers - one with a woman firing guns above the title "Assassin's Blood" the other with a woman screaming and glowing with the title "Curse of a Banshee"

List hosted on MailChimp, information will only be used for Newsletter contact, and we do not send spam.

Wednesday, 16 September 2020

Recipe: Set Chocolate Mousse #GlutenFree #EggFree

Recipe: Chocolate Mousse

Set Chocolate Mousse


This recipe is easy, delicious and very versatile. I made it last weekend for my family and it went down very well with everyone but my mother, but she doesn't like dark choc, so not really surprising. Might want to make the milk choc version for those with a sweeter tooth. Next time I plan to add a little orange liqueur to spice it up a bit.๐Ÿ˜‹

The actual recipe comes from here: The Perfect Refuge an absolutely delightful Italian cooking channel on Youtube, but I use something of a different method, so I thought I would post it. This is the vid of the original recipe, and there is a second option using eggs as well - turn on the subtitles for English.


~15 slices (My father was the only one who managed to eat 2๐Ÿ˜‚)

Ingredients

  • 250ml/1.05 cup cream (I used double, but I suspect single would be okay)
  • 40g/ 0.4 cup cocoa
  • 1 lt/4 cups milk
  • 150g dark (or milk) chocolate (3/4 cup of choc chips)
  • 70g/ 2/3 cup potato starch or corn flour (starch)
  • 60g/ 1/4 cup sugar (only need this is using dark choc - milk has plenty of sugar)

Equipment

  • 1 large mixing bowl, 1 medium one
  • scales/measuring cups/measuring jug
  • hand whisk
  • sieve
  • large saucepan
  • large rectangular dessert/terrine tin

Instructions

  1. Put the cocoa in the large bowl and slowly add the cream bit by bit using the whisk. You will end up with a thick paste.
  2. Add a splash of the milk to the paste to loosen it with the whisk, then keep adding and stirring until you've added about half the milk.
  3. In the medium bowl mix the corn flour/potato starch with the rest of the milk and whisk together.
  4. Add the corn flour/milk mixture into the cocoa mixture bit by bit using the whisk, making sure it combines well.
  5. Sieve the liquid into the large saucepan and push through any lumps remaining in the sieve. (I had just a few little ones).
  6. Heat gently on the hob and break in the chocolate.
  7. Stir continuously while the chocolate melts, then bring the mixture to the boil.
  8. Boil gently for 2 mins or until the mixture has thickened (took me more like 5, but I was heating it very gently because I fear the mixture splitting).
  9. Line the tin with cling film (if your mould is silicon, this step may be unnecessary, but it makes like a lot easier),
  10. Pour in the mixture and place more cling film over the top, in contact with the mixture.
  11. Place the dessert in the fridge for 5-6 hours min (I did mine overnight).
When you are ready to serve, remove the top cling film, turn it out onto a large platter, remove the rest of the cling film, and dust with a little cocoa. Slice with a sharp knife into individual portions. Serve will little crunchy biscuits for a bit more texture - it would be wonderful with amaretti.

It is really nice with a little more cream drizzled on if you like you desserts even richer.

Banner Photo by Ihor N on Unsplash

Tuesday, 19 May 2020

Recipe: Chocolate Chip Cake - no added refined sugar

Recipe: Chocolate Chip Cake


Chocolate Chip Cake - no added refined sugar


So as I have mentioned before, I am trying to cut down on the refined sugar in my diet, and hence I am baking with things like honey and maple syrup as sweeteners. This recipe uses maple syrup instead of the brown and white sugar it originally had, so it is not as cookie like as the original, but it is very yummy and the maple gives a wonderful flavour.

I also cut the ingredients by half, since there are only the two of us at home, and it was still more than enough for a family. Just double up if you would like the 24 pieces the original recipe promised.

This is best eaten with a beverage of choice and would be heavenly with a glass of milk, but goes equally well with tea or coffee.

You could also throw in some nuts or some dried fruit if that floats your boat.

Ingredients

  • 165g (1 1/3 cups) all purpose flour
  • 1tsp baking soda
  • 1 tbsp corn starch
  • 1/2 tsp salt
  • 85g (3/8 cup) unsalted butter
  • 140ml (~2/3 cup) maple syrup
  • 1 large egg
  • 1/2 tbsp vanilla extract
  • 100g (1 cup) dark chocolate chips

Instructions

  1. Preheat the over to 160C/325F
  2. Melt the butter in the microwave or in a pan and allow to cool slightly.
  3. Line a 4x8'' baking pan with baking parchment/grease-proof paper.
  4. Add the flour, baking soda, corn starch and salt and mix together in a bowl.
  5. Put the melted butter into a large bowl, add the maple syrup and mix together.
  6. Add the egg and vanilla to this mixture and whisk until it is light brown.
  7. Add the dry ingredients into the wet and combine.
  8. Stir in the chocolate chips.
  9. Put the mixture into the lined baking pan.
  10. Bake for between 25-30 mins depending on your oven until a tooth pick comes out clean.
This cake will keep up to a week in an airtight container and it gets better the second day.

And it's Tuesday!

That means it's Sexy Stories podcast day over at VirginiaWaytes.com. The Manor is taking a 1 week mid-season break, so I have sexy vampires for you on the podcast.

We have the podcast for all the naughty bits, and the eBook for all the plot and the naughty bits.
Forgotten Soul is one of my permanently free eBooks too, so win/win.

Friday, 17 April 2020

Recipe: Healthier Chocolate Mayo Cake with Healthy Chocolate Frosting

Recipe: Chocolate Mayo Cake


๐Ÿ’–If you are looking for today's AtoZ post, please scroll down to the previous post. ๐Ÿ’–

Healthier Chocolate Mayo Cake with Healthy Chocolate Frosting


Now, I'm not trying to claim this is a healthy cake - its chocolate and sweet things, but as I have mentioned I am trying to cut out as much processed sugar as possible from my diet, and cut down on the amount of other sugars too, because I was eating way too much junk. This has led me to trying sugar alternatives (not sweeteners - because I hate them and lots of them are terrible for us) like honey and maple, because these have good properties as well as all the calories. ๐Ÿ˜‚ Before you say it, I know, it's still sugar, but it's better than all the processed stuff.

This is a fabulous site for working out how to bake with honey rather than sugar: BeeMaid Honey Converter.

So this recipe is based off of this one: Chocolate Mayonnaise Cake, but mine is way smaller and also uses honey and maple for the main cake and has a healthy frosting.

This cake comes out very dark, moist and rich - I would recommend it to dark chocolate lovers. Probably not the best cake for children as is, since they tend to like sweeter things. [Edit - have a chance to test this out - my sister says it is delicious - see the bottom for an alternative, coffee buttercream frosting for those with a sweeter tooth.]

Makes a 7 inch cake - just scale up for more.

Ingredients

For the cake

  • 1 large egg
  • 87g 2/3cup plain/all purpose flour
  • 23g/ 1/4cup unsweetened cocoa powder
  • 1/3 tsp baking powder
  • 2/3 tsp baking soda
  • a smidgen of salt
  • 50ml honey
  • 37ml maple syrup
  • 1/2 tsp vanilla
  • 73g 1/3 cup mayo (full fat or light)
  • 1/2 tsp instant coffee dissolved in just under 1/2 cup of water (or just water if you don't want you cake so dark)
  • 50g extra dark chocolate chips
For the frosting (from here)
  • 50g  1/5 cup cocoa powder
  • 60g 1/4 cup Greek yoghurt
  • 2-3 tbsp honey

Instructions


  1. Preheat the over to 160C/320F
  2. Butter or spray a 7 inch round cake pan (or quiv) and line the bottom with baking paper.
  3. Sieve together the flour, cocoa, baking powder, baking soda and salt into a bowl - set aside.
  4. Using a stand mixer with a paddle or a hand mixer, combine the egg, honey, maple and vanilla in a large bowl on high speed for 4-5 mins until they are light in colour and fluffyish in texture.
  5. Add the mayo and combine on low speed.
  6. Use a spatula to make sure nothing is stuck to the sides of the bowl.
  7. Starting and ending with the dry ingredients, add the flour mixture and mix slowly, then some of the coffee/water, and repeat until all the ingredients are combined.
  8. Fold in the chocolate chips.
  9. Pour the mixture into the cake pan and place in the oven. Cook for 25-30 mins until a tooth pick comes out clean.
  10. Leave to completely cool on a cake rack.
  11. Mix all the ingredients for the frosting in a bowl with a spatula or hand mixer.
  12. Use a spatula or spoon to spread the frosting on the cake.
  13. Eat!
Now as I said above, this is a very dark recipe. We could only eat a small piece at a time, which was perfect ๐Ÿ’– and it goes really well with a nice coffee or tea. If you like cake less dark, I would suggest a lighter chocolate frosting, or even a vanilla one. The original recipe suggest chocolate ganache, but a butter cream would work too.

Because the frosting is yoghurt based, you will need to keep this cake in the fridge, and believe me, it improves with age too. It can be kept up to a week.

Alternative Frosting
Coffee Buttercream

This is enough to do a 9inch cake or 6 cup cakes.

  • 125g (approx 1 stick) butter at room temp
  • 250g icing sugar (confectioners sugar)
  • a splash of vanilla extract
  • 1.5 tsp instant coffee
  • 0.5 tbsp boiling water

  1. In a ramekin or similar, mix the coffee and boiling water and leave aside so it can cool down.
  2. Using a stand mixer or a hand mixer, whisk the butter in a large bowl until it is light and fluffy - this can take up to 5 min.
  3. Add the icing sugar slowly and whisk in each batch until combined and the mixture is smooth. Take time to prevent the mixture being grainy.
  4. Add the vanilla and coffee and whisk one more time to combine.
BG banner Photo by Taisiia Shestopal on Unsplash


Thursday, 5 March 2020

Recipe Recommendation: Black Bean Brownies (The Delicious Healthy Option) #GlutenFree

Recipe Rec - Black Bean Brownies (The Delicious Healthy Option)

Recipe Recommendation: Black Bean Brownies 

(The Delicious Healthy Option) #GlutenFree

So I have been making a conscious effort to improve my diet, because, frankly I used to eat far too much crap. One of the big things I am doing is reducing the amount of refined sugar I eat.

Now I have to admit, this was really hard for the first week. They are right that sugar is more addictive than cocaine - however, it seems withdrawal doesn't last that long ๐Ÿ˜‚. I've been doing this since New Year and I find that I don't really crave the sweet things that often anymore.

However, I cannot live without chocolate. Sorry - never going to happen. And also, research says that dark chocolate has some great properties, so I have moved on to having some dark chocolate every day - the 72% or 85%, which are supposed to have all the good stuff in them.


I miss cake, though, so have been looking for alternatives. Now I have a new Instant Pot (which I will talk about more in later posts) and while looking for recipes for that I came across a website called iFOODreal run by a lovely lady called Olena Osipov which has some fabulous recipes on it. She also has a great Youtube channel.


One of these recipes is Black Bean Brownies - yes that is brownies made from black beans.

Good news for my gluten intolerant friends too - this recipe is gluten free.

Now I know what you're thinking, probably the same as I did - black beans? Really?

Well I made this recipe the other day and everyone loves it. They are delicious.


Word of warning - this is a very dark chocolate recipe, so if you're not into dark chocolate, this will not be for you. All the sweetness comes from fruit and there is no added refined sugar, so the brownies are dense, squidgy and wonderful with a cup of tea or coffee. They also get better with time IMHO, so if you can leave some overnight they improve even more.


If you want to see the whole recipe, and all the advice Olena gives, than check out her original post:
Black Bean Brownies.

I'm going to include the ingredients here because all the measurements are in North American style on iFOODreal, so here are the UK/Metric equivalents.

Ingredients

  • 400g tin of Black Beans
  • 2 large eggs
  • 155g unsweetened apple sauce (I looked up 1/2 cup and is said 125g, but I had a small 155g jar and it just about filled my 1/2 cup measure, so that's what I'm going with) - I think next time I will use the over-ripe banana idea though, because it's easier to get.
  • 15 small or 10-12 Medjool dates (I used the small ones)
  • the original recipe has 2 tbsp brewed coffee, but I threw in a tsp of instant coffee for a similar effect, since I didn't have brewed coffee on hand.
  • 1 tsp pure vanilla extract
  • 50g cacao or cocoa powder (cacao is better for you, but is not as easy to get)
  • 1/2 tsp baking powder
  • 1/4 tsp salt
  • 100g bag of extra dark chocolate chips (I used Dr Oetkers 72% choc chips) - 50g for inside, 50g for the top (this may not be quite the right amounts, but it made it easy for me๐Ÿ˜‚).

Tips

  • A stick blender works well to blend the batter - my food processor is not overly great and I don't have a normal blender, so I used the stick one and it came out brilliantly.
  • Oven temp conversion (350F) - 180C or Gas Mark 4
  • I didn't have an 8x8 brownie tin so I used a 20cm/8inch sponge tin instead and just cut the brownies into cake style slices.
  • Cutting it into 16 might make the pieces look small, but they aren't - trust me - each piece is just enough.
  • I checked my brownies after 25min not 30 and they were perfect so I didn't use the final 5min of cooking time. It will depend on your oven.
  • Do not, and I repeat, do not skip the baking parchment lining. Because these don't use flour, they are not as robust as brownies can be, so getting them out of the tin was ... well ... entertaining. Without the baking paper I would have been sunk.
๐Ÿ’–Yummy brownies that have things in them that are actually good for us - win/win! Don't forget to check out Olena's other delicious recipes and tips for hearty, healthy eating.๐Ÿ’–

Do you have any favourite recipes that taste decadent, but are, in fact, surprisingly healthy? I would love to hear what they are.

Banner BG Photo by Alison Marras on Unsplash

Sunday, 19 January 2020

Recipe Recommendation - 3 Ingredient Banana Oatmeal Breakfast Cookies (#GlutenFree, #Vegan)


Recipe: Banana, Oat and Chocolate Chip Cookie

Recipe Recommendation

3 Ingredient Banana Oatmeal Breakfast Cookies

Gluten Free and Vegan

So Soph (my sister) was recommended this recipe on Youtube after she started looking up overnight oat recipes, but I was the first to try it. I made these yesterday morning and this morning because I had the bananas and the cookies keep well in the fridge or freeze and they disappear fast.

Many of the recipes I have seen for breakfast cookies require loads of honey or some other sugar substitute, but all the sweetness in these comes from the bananas. The riper the bananas the sweeter the cookies and more prevalent the banana flavour - so we can adjust how we like our cookies by how ripe our bananas are. Personally I like them relatively sweet, so my bananas were on the brown side.

Of course the chocolate has sugar in it, but we're not dumping in huge amounts of refined sugar at the cookie level, so it is much better for us.

There is no lie in the title, these cookies literally only have 3 ingredients (I've listed them out with measures to add in the metric measurements as well - the original recipe is in US measurements). 
  • 2 large Bananas
  • 1.5 cups / 135g Rolled Oats - I picked up gluten free porridge oats
  • 1/3 cup Dark Chocolate Chips (I just used a standard 100g packet of Dr Oetker 70% Extra Dark Chocolate Chunks - which is probably loads too much, but it works ๐Ÿ˜‚ - use vegan chocolate chips if required)
I mean we could easily add other things if we wanted too like nuts or raisins or even a little spice, just as long as we don't add too much and loose all structural integrity of the cookies.

Word of warning - do not touch these when they first come out of the over unless you like being covered in chocolate! Leave them to cool completely before attempting to eat. ๐Ÿ˜‚

Banana, oat and chocolate chip cookies on a cooling rack.
Waiting, waiting, waiting for them to cool!
This is the original recipe video from the Clean & Delicious Youtube channel - which has just about everything we need to know, but I've put a few tips below it, that I found most important along the way.


  1. For those who are metric 350F = ~180C = Gas Mark 4
  2. The only sweetness comes from the bananas so the riper they are the better IMHO.
  3. A fork is okay for squishing the bananas, but a potato masher is much faster ๐Ÿ˜‚.
  4. Mix the oats and banana and then cover them (I bought some silicone stretch lids before Christmas and they are awesome for such things - no more cling film) and let them sit for 20mins or so, so the oats absorb the banana - gives a moister cookie and better structural integrity.
  5. I baked mine on the lower end at 15mins and they are moist and chewy.
  6. Try not to eat them all at the same time.๐Ÿ˜‚๐Ÿ˜‚๐Ÿ˜‚
These are moist, delicious and filling. Could not recommend them enough. These are perfect for those of us trying to cut down on our chocolate bar consumption, but still find ourselves in need of a chocolate hit - and studies have suggested that dark chocolate is good for us too, so yay!

Tuesday, 22 May 2018

Recipe - Malted Chocolate Cake with Malteser (Malt Ball) Edging


Malted Chocolate Cake with Malteser (Malt Ball) Edging

This makes a very large cake that will easily serve 12-14 people, depending on their stamina for chocolate. It is also very easy to decorate and make look pretty without any great skill, because I am not good at icing cakes. This is definitely a celebration cake and the malt icing gives a lovely break from the rich chocolate. I've made this cake three times in 2 months :). (Forgot to add - it's based off of this recipe, but, as usual, I've played with it and this is not the pinata version).

Equipment

  • 2 20cm cake tins
  • grease proof/parchment paper
  • mixer
  • bowls
  • cake cutter or knife
  • pallet knife or spatula
  • measuring equipment
  • cake board

Ingredients

For the cake
  • 400g/14oz/1 3.4cups/3.5 sticks butter/cooking spread (room temp)
  • 400g/10oz/2 cups caster (super-fine) sugar
  • 8 medium eggs (7 large)
  • 300g/11oz/2 cups self-raising flour
  • 50g/2oz/~1/2 cup malt-flavoured drinking powder (e.g. Horlicks)
  • 60g/2.25oz/~1/2 cup cocoa powder
For the icing and decoration
  • 100g/3.5oz milk chocolate
  • 100g/3.5oz dark chocolate (70% cocoa)
  • 1 large bag (93g) Maltesers or malt balls + extra for decorating
  • 365g/1.7 cups butter (room temp and soft)
  • 700g/5.6 cups icing sugar
  • 3 tbsp cocoa powder
  • 2.5 tbsp milk
  • 2.5 tbsp malt-flavoured drinking powder (e.g. Horlicks)
  • any sprinkles that take your fancy

Instructions

For the cake
  1. Preheat the oven to 180C (350F)/160C (320F) fan/Gas mark 6
  2. Line the base of the cake tins with grease proof paper and grease the sides with butter.
  3. Cream together the caster sugar and butter in a large mixing bowl until light and fluffy.
  4. Beat the eggs in a jug or bowl and add to the butter and sugar a little at a time. If the mixture curdled (looks lumpy) add a spoonful or two of the flour to bring it back.
  5. Mix in the flour, cocoa and malt powder until smooth and completely combined.
  6. Spoon half the mixture into each cake tin.
  7. Bake in the oven for 45-50mins - they should be just firm to the touch and a skewer should come out clean when they are done.
  8. Leave to cool a little, then turn out onto a wire wrack to cool completely.
  9. Divide each cake in half with the cake cutter to make four layers in all and if there is a slight mound on the top of the cake which will be on the bottom, flatten this off with cake cutter as well.
For the icing
  1. Place the icing sugar and butter into the mixer or in a large bowl if using a hand mixer and beat together until light and fluffy. (Place a cloth round the top of the bowl when first mixing to prevent icing sugar going everywhere :)).
  2. Divide the mixture in half.
  3. Melt the chocolate in a bowl, either over a pan of simmering water, or in 30s intervals in the microwave. Allow to cool a little.
  4. Beat the chocolate and 1tbsp of milk into half of the icing. Add a little more milk if the icing is thick and grainy and beat until it is smooth.
  5. To the other half of the icing beat in the malt powder and the other tbsp of milk. If the icing is too thick add a little more milk until the icing is of a consistency to spread.
To assemble the cake (the amounts of icing are only approximate)
  1. Take the first layer of cake and cement it to the cake board with a little splodge of icing.
  2. Spread 1/4 of the malt icing over the surface.
  3. Place the second layer of cake on top.
  4. Spread 1/3 chocolate icing over the surface.
  5. Place the 3rd layer of cake on top.
  6. Spread with 1/4 of the malt icing.
  7. Place the 4th layer of cake on top.
  8. Crush the Maltesers in a bowl (easiest way is using the end of a rolling pin)
  9. Cover the sides of the cake in the other half of the malt icing.
  10. Using a hand, coat the malt icing with a layer the crushed Maltesers.
  11. Spread the rest of the chocolate icing on the top of the cake and decorate with a few whole Maltesers and sprinkles.
Version of the cake I made for Easter 2019

Tuesday, 14 November 2017

Recipe - White Chocolate, Mascarpone and Puffed Wheat Cheesecake with Dark Chocolate Ganache


White Chocolate, Mascarpone and Puffed Wheat Cheesecake with Dark Chocolate Ganache

This is most definitely not a recipe for every day, it is delicious and very decadent! It is something of an amalgam of recipes because I went to a birthday party the other day and they had this wonderful birthday cheesecake. I asked about the recipe, as you do, but didn't get all the details, hence I used what I had gathered and looked at other recipes. I have reduced the amount of ganache in this recipe to that which I used when I made it, because there was a little too much of it.

This makes a cheesecake that will easily serve 12-15 people - it served 5 of us and we only got through a third.

Equipment


  • 1 heat proof bowl
  • 1 large mixing bowl
  • grease proof paper
  • 10.5'' / 27cm spring form tin (you could use a slightly smaller one, just make sure it's a deep one)
  • 1 shallow dish
  • 1 medium saucepan
  • spatulas and spoons

Ingredients

For the cheesecake
  • 280g / 1 1/4 cup / 10oz cream cheese
  • 250g / 1 1/8 cup / 9oz mascarpone
  • 300ml / 1 1/4 cup double (heavy) cream
  • 2x150g (10.6oz) white chocolate
  • 200g / 7oz rich tea fingers (closes US equiv is probably graham crackers)
  • 50g / 1.8oz puffed wheat
  • drizzle of honey
For the ganache
  • 200ml / 1 cup double (heavy) cream
  • 200g / 7oz dark chocolate
Anything you like to decorate.

Instructions

  1. Line the base of the spring form tin with the grease proof paper.
  2. Lay the biscuit fingers flat in the base of the tin, covering as much of it as possible. (Breaking the biscuits into bits can be used to fill in large holes).
  3. Lay the puffed wheat in the base of the shallow bowl and drizzle with honey. Then stir to coat. (You can use Honey Monster Puffs that are pre-coated, but the plain ones were much cheaper, hence this work around :)).
  4. Melt the chocolate in the heat proof bowl. (I microwave it on full for 30s at a time, but you can also gently heat it above a saucepan of hot water as well). Leave to cool.
  5. Whip the cream until it is beginning to thicken.
  6. Add the cream cheese and the mascarpone and whisk again until it begins to hold its shape (not too much or you will end up with cottage cheese).
  7. Pour in the white chocolate and mix vigorously with a spatula. (It might look grainy for a few moments, but don't worry, it is supposed to become much stiffer).
  8. Add the puffed wheat and mix through.
  9. Carefully add the cheesecake mixture over the layer of rich tea biscuits, smoothing out to the sides.
  10. Add another layer of rich tea biscuits on top and refrigerate.
  11. To make the ganache, break the chocolate into a heat proof bowl.
  12. Put the 200ml of cream into a saucepan and bring to the boil. Boil gently for 1 min watching carefully to make sure it does not bubble over.
  13. Pour the cream over the chocolate and mix to melt it all together to make a lovely shiny fluid.
  14. Remove the cheesecake from the fridge and pour over the ganache.
  15. Decorate as required and return to the fridge until needed.
The puffed wheat give this cheesecake the most wonderful texture. It was described to me like Kinder Chocolate with cereals, but I've never had one of those so I can't compare :). All I know was it was yummy.

Thursday, 10 August 2017

Recipe: Delicious Sticky Chocolate and Treacle Cake

Delicious Sticky Chocolate and Treacle Cake

This is based of the "Delicious Sticky Ginger Cake" recipe I posted last week. It's my own creation and was consumed with great speed by Rob's work colleagues who were very happy to test it for me. This makes a soft, light, sticky chocolate cake, but you do have like treacle too because that is a prevelant flavour along with the chocolate.

The only changes are:

  • substituting some of the flour with cocoa, 
  • adding vanilla instead of cinamon, 
  • 2 tblsps of golden syrup rather than one to up the liquid content slightly because cocoa is drier than flour, 
  • and an extra 1/4 tspn of bicarb to account for the cocoa being more acidic than flour.

Equipment

  • 1 large saucepan
  • 1 small (milk) saucepan
  • 1 bowl
  • scales
  • spatula
  • 2 2lb loaf tins (approx 21x11x7cm | 8x4x3inches)
  • loaf tin liners or grease proof paper or baking parchment
  • small hand whisk or fork
This recipe uses the hob to heat ingredients, you could probably use a microwave if you are more familiar with that - just use microwave proof bowls instead of saucepans.

Ingredients

  • 8oz | 230g | 2/3 cup Black Treacle (Molasses)
  • 8oz | 230g | 1 cup Soft Spread (you can use butter, but a baking spread makes a lighter cake)
  • 8oz | 230g | 1 1/4 cup Dark Brown Sugar
  • 2 tbsp Golden Syrup (US peeps, if it's not in the baking section, try the international section - at a push you could use corn syrup)
  • 1/2 pt (UK) | 285ml | 1 1/3 cup milk (I used semi skimmed, but the recipe probably originally used whole milk - so just use what you have)
  • 3/4 tspn Bicarbonate of Soda (Baking Soda)
  • 9.4oz | 265g | 1 4/5 cup self raising (rising) flour
  • 2.6oz | 75g |  3/4 cup cocoa
  • 1 tblsp vanilla extract
  • 1 large egg

Instructions

  1. Preheat the oven to 150C | 300F | Gas Mark 2.
  2. Put the loaf tin liners in the loaf tins or line the tins with you lining of choice. (You really don't want to try and get this cake out of an unlined tin - it is very soft and moist ;)).
  3. Put the treacle, soft spread, brown sugar and syrup into the large saucepan.
  4. Heat gently until these all melt together, stiring at times to make sure it all mixes.
  5. Measure out the flour and cocoa into a bowl and put aside for later.
  6. Put the milk and egg into the small saucepan and beat the egg into the milk using a small hand whisk or a fork.
  7. Add the flour and cocoa to the treacle mixture in the saucepan and stir together.
  8. Add the vanilla to the treacle mixture and stir.
  9. Heat the milk/egg mixture gently to blood temperature (easiest way to measure is to stick your little finger in every now and then and when it feels like it isn't cold it's at the right temperature :)).
  10. Add the bicarb to the milk mixture and stir.
  11. Add the milk mixture to the treacle mixture and stir together.
  12. Pour the cake batter into the two loaf tins.
  13. Put the cakes in the oven and bake for about 1hr (stick a skewer into the middle of the cake to check it is done, if not let it cook a little longer).
  14. Take out of the oven and allow to cool in the tins until cool enough to handle, then turn out onto a wire cake rack to finish cooling.
The cake keeps very well, easily up to a week and even up to 2 weeks - just pop into an air tight tin. This is a moist cake, so it actually improves with age.

Tuesday, 1 August 2017

Delicious Sticky Ginger Cake


Delicious Sticky Ginger Cake


This is my mother's ginger cake recipe and I have loved it most of my life. I always find other people's ginger cake not gingery enough and I figured out why when I finally nabbed the recipe off her There is a lot of ginger in this. If you don't like it quite so gingery, alter the amount to your own taste.

This recipe is also one of the easiest cake recipes there is - no folding, no need for electric whisks, just a couple of sauce pans and a flick of the wrist. It turns out perfectly every time.

The recipe is enough to make one huge cake, but my mother recommends making two smaller cakes in loaf tins because otherwise the cake sinks in the middle and it's harder to make sure the middle is done and the outside is not over done :).

I finally remembered to take a picture of the finished product, but, as you can see, not before I had given my hubby a slice :).

Equipment

  • 1 large saucepan
  • 1 small (milk) saucepan
  • 1 bowl
  • scales
  • spatula
  • 2 2lb loaf tins (approx 21x11x7cm | 8x4x3inches)
  • loaf tin liners or grease proof paper or baking parchment
  • small hand whisk or fork
This recipe uses the hob to heat ingredients, you could probably use a microwave if you are more familiar with that - just use microwave proof bowls instead of saucepans.

Ingredients

  • 8oz | 230g | 2/3 cup Black Treacle (Molasses)
  • 8oz | 230g | 1 cup Soft Spread (you can use butter, but a baking spread makes a lighter cake)
  • 8oz | 230g | 1 1/4 cup Dark Brown Sugar
  • 1 tbsp Golden Syrup (US peeps, if it's not in the baking section, try the international section - at a push you could use corn syrup)
  • 1/2 pt (UK) | 285ml | 1 1/3 cup milk (I used semi skimmed, but the recipe probably originally used whole milk - so just use what you have)
  • 1/2 tspn Bicarbonate of Soda (Baking Soda)
  • 12oz | 340g | 2 3/4 cup self raising (rising) flour
  • 25g | 4 tbsp ginger (yes that really is table spoons not teaspoons)
  • 2 tspn cinnamon
  • 1 large egg

Instructions

  1. Preheat the oven to 150C | 300F | Gas Mark 2.
  2. Put the loaf tin liners in the loaf tins or line the tins with you lining of choice. (You really don't want to try and get this cake out of an unlined tin - it is very soft and moist ;)).
  3. Put the treacle, soft spread, brown sugar and syrup into the large saucepan.
  4. Heat gently until these all melt together, stiring at times to make sure it all mixes.
    Don't stop stiring yet!This is what you're after
  5. Measure out the flour, ginger and cinnamon into a bowl and put aside for later.
  6. Put the milk and egg into the small saucepan and beat the egg into the milk using a small hand whisk or a fork.
  7. Add the flour, ginger and cinnamon to the treacle mixture in the saucepan and stir together.
    Stir gently in circles to mix in flour them beat
    vigorously until all the lumps are gone.
    This is what you are after
  8. Heat the milk/egg mixture gently to blood temperature (easiest way to measure is to stick your little finger in every now and then and when it feels like it isn't cold it's at the right temperature :)).
  9. Add the bicarb to the milk mixture and stir.
  10. Add the milk mixture to the treacle mixture and stir together.
    Stir as quickly as you can, but take it easy.There will be bubbles showing as the bicard activates
  11. Pour the cake batter into the two loaf tins.
  12. Put the cakes in the oven and bake for about 1hr (stick a skewer into the middle of the cake to check it is done, if not let it cook a little longer).
  13. Take out of the oven and allow to cool in the tins until cool enough to handle, then turn out onto a wire cake rack to finish cooling.
The cake keeps very well, easily up to a week and even up to 2 weeks (if it lasts that long :D) - just pop into an air tight tin. This is a moist cake, so it actually improves with age.

Tuesday, 18 July 2017

Banana Cupcakes with Vanilla Icing #TipsTuesdays


Banana Cupcakes with Vanilla Icing


This is another fabulous recipe that is one of my favourites, even though I now realise I haven't made it in ages :) *Makes note to buy some bananas* I have mentioned it before on this blog, but never posted the whole thing. This would undoubtedly be really nice if you added a tablespoon of rum to the bananas and took out a tablespoon of the butter milk too ;).

Equipment:

  • Large mixing bowl
  • medium missing bowl
  • Fork or mouli for blitzing 
  • Sieve
  • Two to three bun trays
  • Measuring equipment (baking is a science rather than an art so you'll need to measure)
  • Bun cases
  • Electric hand mixer
  • 2 teaspoons
  • spatula (not vital, but makes life much easier)
  • wire rack
  • Piping bag

Ingredients:

Cup Cakes
  • 255g (2 1/4 cups) of plain flour (sifted)
  • 110g (1/2 cup) of unsalted butter
  • 2 ripe bananas (the riper they are the better the cupcakes taste)
  • 55ml (1/4 cup) of buttermilk
  • 2 eggs
  • 115g (1 cup) of sugar (caster)
  • 1 tsp vanilla extract
  • 1/2 tsp baking soda
  • 2 1/2 tsps baking powder
  • 1/4 tsp salt
Icing:
  • 440g icing sugar (confectioner's sugar)
  • 300g unsalted butter (softened)
  • 2 tsps of vanilla extract
  • Sprinkles to decorate

Instructions

  1. Preheat the over to 190C/375F/Gas mark 5
  2. Place bun cases in the bun tins
  3. Sift the flour, baking powder and baking soda, along with the salt into a middle sized bowl and combine thoroughly
  4. Place the butter and vanilla into the big mixing bowl and use the electric mixer to whip together until creamy and light in colour (you can do it by hand, but it will take longer)
  5. Add the sugar bit by bit, beating so that the mixture becomes light and fluffy
  6. Add in the eggs one at a time, beating each in before adding the next
  7. Mash the banana (either with a fork or an electric hand blender)
  8. Add a little of the butter milk and beat in, then add in some of the dry mixture and beat in, then add some of the banana and beat in.
  9. Repeat step 8 until all the ingredients are combined.
  10. Using the two teaspoons, spoon the mixture into the bun cases (to just over half full – about two teaspoons full)
  11. Bake in the oven for between 18 and 20 mins until golden on top - they will rise into quite sharp mounds
  12. Take out of the oven and leave to cool on a wire rack
  13. For the topping put all the ingredients into a large bowl (I did it in two lots to make it easier) and combine using the electric whisk until they go light and fluffy
  14. Put the icing into a piping bag and pipe over the cooled cup cakes (you can spoon it on if you don't have a piping bag) - this is where the spatula comes into it's own to get the last of the icing from the bowl.
  15. Sprinkle randomly with petty edible things :)

Tuesday, 11 July 2017

Double Chocolate Fudge Cakes - Gluten Free


Now I've mentioned this recipe before, but it was linked to a Livejournal post of mine and I really don't trust LJ anymore, so I'm reposting it here. This recipe uses corn flour (corn starch) and ground almonds instead of flour so it is gluten free.

Double Chocolate Fudge Cakes - Gluten Free

I'm going to put two lots of ingredients up here - to make 12 small cakes or to make one large 3 decker cake. I've done my best to put in US cup/stick measures as well as the UK ones.
How the individual cakes come out.
Ingredients

12 individual cakes

For the cake
  • 200g dark chocolate (70% cocoa solids or above) (1 1/4 cups of dark choc chips)
  • 100g unsalted butter, cubed (just under 1 stick butter)
  • 4 medium eggs
  • 50g arrowroot or corn flour (corn starch), sifted (2/5 cup)
  • 175g icing sugar, sifted (1 2/5 cup)
  • 25ml rum or milk (1.5 tbsp)
  • 100g ground almonds (4/5 cup)
  • 1/4 tspn cream of tartar
For the icing
  • 100g dark chocolate (70% cocoa solids) (2/3 cup dark choc chips)
  • 50g creme fraiche (1/5 cup)
  • 75g icing sugar (just under 2/3 cup)
  • something to decorate like sugared violets or silver balls or anything like that
~OR~

3 tier large cake

  • 300g dark chocolate (70% cocoa solids or above) (1 4/5 cups of dark choc chips)
  • 150g unsalted butter, cubed (1 1/3 sticks)
  • 6 medium eggs
  • 75g arrowroot or corn flour (corn starch), sifted (2/3 cup)
  • 260g icing sugar, sifted (2 cup)
  • 37ml rum or milk (2 tbsp)
  • 150g ground almonds (1.25 cups)
  • 3/8 tspn cream of tartar
For the icing
  • 200g dark chocolate (70% cocoa solids) (1 1/3 cup dark choc chips)
  • 100g creme fraiche (2/5 cup)
  • 150g icing sugar (1 1/5 cup)
  • something to decorate like sugared violets or silver balls or anything like that

Equipment

  • a large mixing bowl
  • a med heat proof bowl
  • small saucepan
  • metal spoon
  • electric whisk (or you can use a hand whisk if you are feeling up to it :))
  • rubber spatula
  • 4cm deep, 20x30cm baking tray (or 3 8inch/20cm sponge tins)
  • non-stick lining paper (greaseproof)
  • 5cm diameter round cutter

Instuctions

For the cake

  1. Preheat the oven to 180C/350F (160C/320F fan/convection )
  2. Line the baking tray with the non-stick baking paper
  3. Melt the chocolate and butter in the heat proof bowl over the saucepan of simmering water or pop in the microwave on high for 30 secs, then check and keep going in 10sec intervals until chocolate is melting.
  4. Turn melted chocolate into big mixing bowl and allow to cool
  5. Beat in 2 whole egg (3 for large cake) and 2 of the yolks (3 for large cake), reserving the whites for later
  6. Beat in the arrowroot/cornflour, icing sugar, almonds and rum until smooth.
  7. Whisk the two egg whites with the cream of tartar until they reach the soft peaks stage.
  8. Fold the egg whites into the chocolate mixture using a metal spoon or spatula.
  9. Spoon mixture into the lined baking tray (a spatula is very useful for getting it all) or equal amounts into the 3 lines sponge tins for the large cake.
  10. Bake for 15 mins until barely set
  11. Leave to cool in the tray(s).
  12. If doing the individual cakes turn the cold cake out onto a board and cut into 24 rounds with the 5cm cutter, for the large version just turn out the cakes from the sponge tins and remove the lining paper.

For the icing

  1. Melt the chocolate in the heat proof bowl over the saucepan of simmering water or in the microwave at first for 30secs then in 10sec intervals until chocolate is melted.
  2. Beat in the creme fraiche and the icing sugar until smooth (it may split slightly).
  3. Beat in a few teaspoons of boiling water until the consistency turns satiny.
  4. Working qucikly spoon a little of the icing onto each cake round, then stack two together to form 12 little cakes or Sandwich the three cakes together with icing and then use the rest to cover the outside of the cake (if I'm feeling lazy I just do the top, but there is usually enough icing to do the sides as well).
  5. Put on your decoration.
This cake is squidgy and delicious along the lines of a brownie. I only know one person who can eat more than a small bit at a time :).

Tuesday, 5 July 2016

Recipe: Lemon & Lime Vodka Trifle #TipsTuesdays


Welcome to Tips Tuesday 34. Today I would like to share with you a recipe for a wonderful, adult trifle. If you are making it for children or those who don't partake of alcohol, just replace the vodka with water and it will be just as tasty, without the added kick.

Lemon & Lime Vodka Trifle


This makes 12 individual trifles - if you want to make one big one, just put it all into a big bowl. You will probably need to up the number of trifle sponges and reduce the amount of custard.

Ingredients

Instructions

  1. Put some of the vodka in a shallow plate, with a drop of lemon extract and stir to mix. 
  2. Take one of the cut up trifle sponges and allow the pieces to soak up the lemon vodka.
  3. Put four sponge cubes in each of four glasses/bowls you are using to hold your trifle.
  4. Repeat steps 1 to 4 so you have four soaked sponges in each glass. (You can just use a drop of lemon extract on each sponge cube if not using the alcohol. Likewise just soak the whole sponges if doing one big trifle.)
  5. Dissolve the lemon jelly cubes with 285ml boiling water. (This is half the total amount of water suggested on the packet to make the lemon very intense.)
  6. Using a ladle pour equal amounts of jelly into each of the glasses, over the soaked sponge. (If doing just one trifle simply pour the jelly over the trifle sponges into your large bowl).
  7. Put the glasses in the fridge for at least an hour to set.
  8. Dissolve the lime jelly cubes in 150ml water.
  9. Add 200ml of vodka and 100ml cold water and mix. (300ml of cold water if not using vodka.)
  10. Using a ladle pour equal amounts of lime jelly into each glass.
  11. Since there is no whole fruit in this, if you want to make it more fun, you can add lemon jelly sweets to this layer or mandarin segments might work too if you want real fruit - just pop them in when its cooling - I used the small fake lemon segments that can go on cakes. It just adds another texture in there.
  12. Put the glasses back into the fridge to set for at least an hour.
  13. Mix the custard with the lemon extract (If it is not lemony enough for your taste, add a few more drops to the mix - just remember you can always add more, but you can't take it out so taste as you add.)
  14. Leave in the fridge until an hour or so before you are ready to serve.
  15. Whisk the cream until it is in stiff peaks.
  16. Pipe or spoon the cream onto each trifle and add sprinkles for decoration.
These are very straightforward recipe that can be fun for adults and children alike, with just a couple of tweaks. It works well in clear plastic cups - because as with all trifles, it's fun to see the layers.

Tuesday, 1 March 2016

3 Variations on Gluten-Free Peanut Butter and Choc Chip Cookies (delicious) - #TipsTuesdays 25


My apologies for not being around the last few days - my husband and I were in London from Sat until yesterday having an awesome long weekend :). Welcome to Tips Tuesdays 25 and today I have the most fabulous recipe for you. You will not believe how good these taste and they have no flour so they are gluten free, which is simply win-win. They only take moments to make - the difficult part is not eating them before they are cool.

The original recipe is from Simply Nigella (I will keep mentioning this book because it is amazing), but I have tried two variations as well that I wanted to share.

3 Variations on Gluten-Free Peanut Butter and Choc Chip Cookies

Ingredients

Original Nigella Lawson Recipe

  • 225g (almost 1 cup) smooth peanut butter
  • 100g (1/2 cup) light soft brown sugar
  • 1/2 tsp bicarbonate of soda (baking soda)
  • pinch of salt
  • 1 large egg
  • 1 tblspn vanilla paste/extract
  • 50g dark choc chips (I use 75g because I like lots of choc chips :))

Cruchy Peanut Butter Choc Chip Cookies

The only change here is to use
  • 250g (1cup) crunchy peanut butter instead of smooth 
- I added more to make the same consistency, but take into account the bits of peanut in the peanut butter as well.

Double Chocolate Peanut Butter Cookies

For these I added
  • 25g (1/4 cup) pure cocoa powder 
- the mix is slightly dryer than the original, but tastes just fine.

Instructions

  1. Pre-heat the oven to 180C (350F, Gas Mark 4).
  2. Put the peanut butter, sugar, bicarb and salt (plus cocoa powder if making the double choc) into a mixing bowl and combine.
    • Tip: I use a free standing mixer with a paddle attachment, but you can use a hand whisk or simply a wooden spoon and some elbow grease.
  3. Add the egg and the vanilla and gently combine
    • Tip: do not be too enthusiastic, do not use the top speed and stop once everything has come together.
  4. Using a spatula/spoon fold in the chocolate chips.
    • Tip: my mixture is usually quite solid by this point, having come together after adding the egg, but it will depend on how soft your peanut butter was to begin with.
  5. Line 2 baking trays with grease proof paper or silicon baking sheets
    • Tip: if you only have one baking tray or a small oven you can do the cookies in 2 batches without any problems - they are not time critical.
  6. Divide the mixture into 16 little mounds on the 2 baking sheets.
    • Tip: the tablespoon measure slightly heaped is just about the right size.
  7. Place in the over and cook for 10 mins only.
  8. Remove from the oven and leave on the baking sheets for 10 mins.
    • Tip: If you try and remove them earlier you will end up with cookie mush - still tasty, but not as attractive :).
  9. Slide onto a wire rack and leave for another 10 mins to cool completely.
    • Tip: They will keep for days in an airtight container.
These are very nice with a cuppa and are very moreish :). My husband's office love them.

Do you have any cookie recipe recommendations?


The launch is almost over - Last Chance to get The Machine for 99c (Free on Kindle Unlimited)

The Machine: Rise of the Gifted
by Natasha Duncan-Drake

Rafe Derouet used to be a world class, British figure skater competing against his arch rival, flamboyant American Louis Hayes. A catastrophic knee injury ended his career and now all he can do is look on from the sidelines, commentating where he used to be a star. He hates Louis and wants nothing more than to see his nemesis go down in a blaze of failure.

Then mysterious men in black with guns take over a press meet, trying to arrest Louis, awakening something dangerous in their target, and setting in motion events they cannot control. Most shocking of all, Rafe finds out Louis can literally read his mind.

Dragged into a murky world of government agents and x-files by one of those x-files, Rafe finds his world view completely changing. And, along the way, his hatred for Louis proves to be something else entirely.

Now Rafe just needs to survive so he can decide what to do about it.

Tuesday, 17 November 2015

How to Cheat Your Way to The Most Amazing Brownie :) - #TipsTuesdays 13


So there has been a lot of darkness since Friday and so I wanted to post something light and inconsequential today to brighten the air, just a little.

How to Cheat Your Way to The Most Amazing Brownie

Normally I bake from scratch, but occasionally I try out the box mixes just for the hell of it - usually if they are on offer, because otherwise it's a ridiculously expensive way of baking a cake (most of the time). I've also found that some box mixes are a bit meh.

However, on Friday morning when I was shopping in B&M I came across this Thorntons Salted Caramel Brownie box mix for 99p (I believe ASDA have it on offer for 1.50 at the moment).


I thought to myself, why not.

Now, I have no doubt that just making up the box per instructions would have made a lovely brownie, however, here's the tip.

You cannot have enough chocolate in a brownie!

Hence I grabbed a bar of dark choc (semi-sweet) I had in the cupboard and chunked about a third of it into bits. Then I added those to the dry mix before I added the melted milk choc and butter.

I managed to produce brownie heaven. It was nearly as good as my friend Jennie's brownies, which are in fact the epitome of brownie making in their squidgy, chocolatey goodness.

P.S. the instructions said to cook for 20 mins for really squidgy and 25 for a firmer texture, but with the extra chocolate, 25 is a must. I checked at 20, but the brownie was still completely molten in the middle and at 25 it was just set.

Also, these were good as soon as they had cooled, but they were even better the next day (I made them Sunday and Rob and I finished the last two yesterday for pudding at dinner time).

Anyone else have any ridiculously easy cheats for delicious things to share?

Tuesday, 11 August 2015

10 Best Sweet Treat Recipes Ever! - #TipsTuesdays 3


Today for Tips Tuesday 3 I have decided to link you to my favourite sweet treat recipes - I have made them all and they are all awesome. Very much worth the calories if you are in the mood for patting yourself on the back or indulging friends and family. The recipes range from cake to fudge, so be ready :).

Tips Tuesdays, is a weekly blog feature where I impart tips on anything that crosses my mind :). There will be recipes, book/film/TV recs (not full reviews, those are for another day), things I discovered by accident, links to websites, basically anything and everything that might be useful.


10 Best Sweet Treat Recipes Ever!
  1. Mimi's Pound Cake
    This is my favourite cake recipe ever and I use it over and over again. You can make the standard vanilla version as shown in the recipe, or you can change it up by adding coffee or exchanging some of the flour for cocoa. It's especially good if you half the mixture and do one half coffee and the other vanilla and then marble the two together.

    The frosting can also be changed. The vanilla version works really well with a chocolate ganache instead of the caramel, or a lemon drizzle. This is a cake that can take anything.
    ~*~
  2. Marshmallow and Biscuit (Cookie) Bites
    Now there are two versions of these that I really love, but they can be made with any hard cookie that you can crush. If you want to jazz them up for a party, they are relatively sticky when you first cut them so you can dip them in sprinkles or use a little edible glitter to make them pretty. Word of advice though - don't use blonde cookies and very pink marshmallows (the big pink and white ones are okay - the little pink ones for floating in hot chocolate are not) unless it's Halloween and you are going for a dead flesh look ;). Come to think of it the mixture using pink marshmallows would make awesome corpse fingers for a horror party if you got your sculpting hat on.

    Banana Flavour Marshmallow BitesThese make a great nibble to go with coffee or tea and in our house they are known as Banana Crack because you can't eat just one.

    Raspberry and Custard Bites
    This version is a little bit more fiddly, but looks more sophisticated when you are done :)
    ~*~
  3. Double Chocolate Fudge Cakes (Gluten Free)
    Here is a recipe for all my gluten intolerant friends that it absolutely as good, if not better than normal chocolate cakes I have tried in the past. This is my favourite chocolate cake recipe.

    The recipe at the link tells you how to make little cupcake size cakes, but I have also used it to make a big layered cake - all I did was make a 3rd extra mixture and split it into three small (8inch) round tins for baking (make sure to line the bottom of the tins with greaseproof or parchment paper.so the cakes turn out easily). Then I double the amount of icing and used it to sandwich the layers and ice over the top and sides of the cake. When doing this version you just have to be careful when handling the cake because it's very soft and brownie like so it will crack.
    ~*~
  4. Banana Cup Cakes With Vanilla Icing
    These are some of the first cupcakes I ever made when getting into my cup cake experimental phase and I still love them. They are lovely and moist and I haven't met anyone who didn't like them, except for the friend who is allergic to bananas :). Always use very ripe bananas - the riper the better the flavour of the cupcakes.
    ~*~
  5. Easy No Bake Cheesecake 
    I kid you not, this is the easiest cheesecake recipe ever and it always sets. Never have a soggy cheesecake again :) The secret to this recipe is the jelly (jello for my US friends) - it not only flavours the cheesecake, but sets it to perfection. I was given this recipe by my mother-in-law, Yvonne, and she always has to make it for family gatherings because it is so popular. You can make whatever flavour you want - whatever is your favourite jelly, run with it.
    ~*~
  6. Galette
    This is a Mary Berry recipe and it is amazing. It is absolutely fabulous with pears in some form of alcohol, whether that means buying some in a jar or poaching your own. I have included a recipe for easy poached pears to go with in in at the link. This is a great recipe for Christmas or any other time of celebration.
    ~*~
  7. Greek Honey Crunch Creams
    These are a fabulous, crunchy cream filled cookie that everyone who likes honey will love. They will keep for a day or so, but not too long, so be prepared to let them be devoured :).
    ~*~
  8. After Eight Cheesecake
    So this is probably the most complex recipe on the list, mostly because you have to layer the cheesecake, so it takes some thinking about. This is not a recipe for those who do not like alcohol since it has two kinds in it. The recipe as written is to make 8 individual cheesecakes, but you could always make one large one if you wanted to. I'm just not sure how it would hold up under it's own weight since I have never done it :).
    ~*~
  9. Awesome Zabaglione
    Such a decadent dessert with lots of lovely cream. I'm not sure how authentic the recipe is, but it sure it yummy.
    ~*~
  10. Easy Chocolate Fudge
    This really is the easiest fudge you will ever make because it's the chocolate that makes it set so you don't have to worry about temperatures of sugar or anything like that. The only thing you must remember to be careful of is over heating - if you over heat it, it will split. I can't find anywhere I have posted this before and I can't for the life of me remember where it originally came from, so here it is:
    Ingredients
    • 500g/1lb2oz Dark Chocolate
    • 75g/2.25oz unsalted butter
    • 400g/14oz canned condensed milk
    • 1/2 tsp vanilla extract
    Instructions
    1. Grease 20cm/8inch tin and line the base with greaseproof or parchment paper.
    2. Melt the chocolate with the butter and condensed milk in a saucepan. As I said above, be careful to do this gently or it will split.
    3. Beat in the vanilla until.
    4. Pour into the tin and allow to set in the fridge.
    5. Cut into squares and eat :).
So there you have them, my favourite sweet treats. I very much hope you enjoy them as much as I do.

What is your favourite sweet treat? Please share and if you have a recipe link, feel free to leave it in the comments too :)