

| Wittegen Press |
 |
| $2.99 | £1.99 Amazon | Other |
Tips Tuesdays, is a weekly blog feature where I impart tips on anything that crosses my mind :). There will be recipes, book/film/TV recs (not full reviews, those are for another day), things I discovered by accident, links to websites, basically anything and everything that might be useful.
ePub - The Easy Way
Now ePub is a very versatile format and can be used to do all sorts of amazing things, but, as I said in last week's post, if you are publishing a novel it is good to keep is simple. If you don't need it, don't put it in and you will be more likely to end up with a document compatible with all eReaders that take that particular format.
I'm going to tell you two possible ways of creating ePubs rather than starting from scratch. The first is the easiest, but if you end up with any issues using that method, the second has worked flawlessly for me for years (or at least the same technique, only creating simple HTML from scratch - you'll see what I mean when you get there :)).
You will need the following pieces of free software for both methods:
- Calibre
- ePubCheck - this is a command line tool that requires Java, if you are only doing the odd book you can use this online checker ePub validator.
- an ePub reader (I use BlueFire)
ePub via Docx and Calibre
Calibre now has a fantastic ePub converter and editor included within it. It always used to be good at converting from certain formats to certain formats, but recently it has really upped its game. This is by far the easiest method of creating an ePub.
- Take your nicely formatted docx you created for Amazon.
- Edit the front information to indicate it is the Google version (ISBN etc).
- Load it in to Calibre using the "Add Book" option.
- Click the convert book option and open the dialog.
- Choose ePub as the output format.
- Browse for your cover image using the button under "Change cover image:"
- Make sure the Author, Publisher, Tags and Series fields have the correct information in them.
- Fill in the description in the last box on the right under the book version no (has two tabs, normal view and html Source.
- Click on ePub Output in the left menu (9th one down) and make sure "Preserve cover aspect ratio" is ticked.
- Click OK and the conversion will start (when it returns you to the main screen you will see a little message in the bottom right (jobs: 1 with a little whirly symbol). When this goes back to jobs: 0 your conversion is complete.
- Save the ePub to disc using the "Save only ePub format to disk in a single directory" option from the "Save to disc" menu.
- Run ePubCheck on your ePub to make sure there are no errors with the structure.
- Open the file with your ePub reader and go through it to check for:
- formatting errors
- missing links
- incorrect links
- missing images
- any other mistakes.
ePub via HTML, Mobi and Calibre
You'll need two extra FREE pieces of software for this method:
| Wittegen Press |
 |
| $2.99 | £1.99 Amazon | Other |
- Mobipocket creator
- An HTML editor - I use PSPad
That HTML version of your book you download from Amazon - this is where is comes in handy. If you didn't download it, don't worry, just go back to KDP bookshelf, click on your book, go down to the bottom of the page that loads and the option is still there to download it. Then click back to return to your bookshelf so you don't republish the book.
- Go to where the zip file of the HTML is stored and extract it (make sure to extract into a directory so the files aren't muddled with any others).
- Click into the new directory and then into the html directory inside that.
- Edit the name of the HTML file to something sensible (the name of the book is a good one :)).
- Open the html file with your HTML editor.
- Remove the line "<meta name="generator" content="Amazon.com" />" since it will no longer be the file generated at Amazon.
- Edit the front content to note that the book is the Google version (ISBN etc)
- Remove the Table of Contents (you will add it back in later using Mobipocket Creator)
- Find every <a href="#TOC"> tag and remove it (do not forget the remove the associated </a> tag as well). If you miss this step it will cause errors in Mobipocket creator later.
- Find the first chapter heading.
- Add in class="chapter" to the paragraph (<p>) tag. If your chapter headings have a unique style you can simple search and replace the whole paragraph tag with a copy of it with class="chapter" inserted. e.g. replace
<p style="margin:2.52% 0.00% 1.68%; text-align:center; page-break-before:always">
with
<p style="margin:2.52% 0.00% 1.68%; text-align:center; page-break-before:always" class="chapter"> - If you didn't search and replace, repeat steps 9 and 10 for all the chapter headings.
- If your chapter headings are formatted like links because they used to link back to the TOC it's a good idea to edit the style to remove the link colour and the underline. It looks better.
- Save the file.
- Open Mobipocket creator and choose the HTML option under import.
- Choose your edited HTML file and click import.
- Click on Cover Image in the left menu and use the Add a cover image button to add your cover image in (remember to hit the update button at the bottom of the tab once you have loaded the image).
- Go to the table of contents menu option
- Click add Table of contents and fill in the following options for the First Level:
Tag name = p,
Attribute = class,
Value = chapter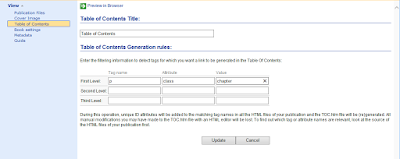
- Click Update
- Go to the Metadata menu option
- Fill in all the details for the book and click update at the bottom of the page.
- Click save.
- Open the containing folder for you work (if you click on files at the top it will tell you where your base folder is).

- Go to the folder where you unzipped the html from Amazon and go into the image folder.
- Copy all the images except for the main cover.
- Go to the folder Mobipocket created, go up one and create a folder called image (you only have to do this the first time you use this method).
- Paste the images you have copied into this directory.
- Go to where you store your cover images and copy the file you added in as the cover in Mobipocket.
- Paste this file into the book folder created by Mobipocket (not the image folder).
- Go back to Mobipocket and click Build - choose "No Compression" and "No encryption".
- If you get warnings you've probably put the image files in the wrong places - just check to see where it says it's looking for the image files in the warning message and then put them there. I always get it wrong at least once :). Then hit build again.
- Once you have built with no warnings or errors preview the file with Mobipocket Reader and check all the links and the formatting.
- If you see any errors, edit the HTML files to correct them (you could probably wait and edit the actual ePub using Calibre, but I always think it's best to go from source).
- Then go to files, highlight the HTML file and delete it.
- Then add the new HTML file in using the Add File option.
- Recreate the Table of Contents.
- Rebuild the book.
- Once you are error free you will have a working .prc file in the book directory that Mobipocket created.
- Open Calibre and add this file using the Add books option.
- Click the convert book option and open the dialog.
- Choose ePub as the output format.
- Make sure the Author, Publisher, Tags, Series and description fields have the correct information in them.
- Click on ePub Output in the left menu (9th one down) and make sure "Preserve cover aspect ratio" os ticked.
- Click OK and the conversion will start (when it returns you to the main screen you will see a little message in the bottom right (jobs: 1 with a little whirly symbol). When this goes back to jobs: 0 your conversion is complete.
- Save the ePub to disc using the "Save only ePub format to disk in a single directory" option from the "Save to disc" menu.
- Run ePubCheck on your ePub to make sure there are no errors with the structure.
- Open the file with your ePub reader and go through it to check for:
- formatting errors
- missing links
- incorrect links
- missing images
- any other mistakes.


| Wittegen Press |
 |
| $3.29 | £2.19 Amazon | Other |
You now have an ePub file ready for upload to Google.
I hope this is a help to some people - I know when I first started this whole eBook thing I had no clue where to begin :).
Do you publish using ePub? What method do you use? Having seen the options, do you think you will use ePub in the future?
If you are a reader, do you ever download the ePub format?
I did basically what you described. I uploaded to Amazon first, which converted my Word doc very nicely into a Mobi. I tried several ways to convert my Doc into an ePub (through Kobo, Calibre, and Smashwords) but none of them worked particularly well - it always threw of the formatting somewhere. I found the best way to make it work was actually to convert my Mobi file in Calibre - it generated the best quality ePub, at least for me.
ReplyDeleteI had way more trouble getting my file to print properly at Createspace. Their printer was doing this weird thing on any page that contained a greyscale image which they kept blaming on my file but I know it was their printer (I worked at a printshop for years). I had to get very creative with my PDF file to get it to look right.
I download and read ePub files all the time. I much prefer them to Amazon's file, which only works on Amazon software and are a pain to extract (because it is very possible that Amazon can just take your books back if they choose to - you only purchase a licence to read them, you don't own a copy of the book). At least with an ePub I can keep the file and read it on whatever reader I choose. Unfortunately an awful lot of people sign up for Amazon exclusively so I do have to buy Kindle more than I would like.
I had problems when I went straight from Amazon's Mobi to ePub in Calibre, but then it was a long time ago I tried it and I hadn't thought to try it again :). I used to create the HTML by hand, and then just subbed in Amazon's HTML to the process when they started letting us because that way I can see what it's actually doing :). I also prefer to edit in something other than Calibre's ePub editor - I find it okay for simple changes, but I've broken things several times when trying to do something complicated.
DeleteDon't get me started on KDP select - I hate the exclusivity part of it - it's so anti-competitive.