Showing posts with label *Food: vegetarian. Show all posts

Sunday, 25 February 2024

Delicious! Stuffed Potato & Parmesan Waffles

Delicious! Stuffed Potato and Parmesan Waffles - picture of a stuffed waffle on a plate with a cheese pull in front of a dark background.

Stuffed Potato & Parmesan Waffles

Gluten Free & Vegetarian

This is a partial repost, but also an updated recipe from back in 2020. The original recipe is for plain potato & parmesan waffles, but my lovely twin just gifted me and my hubby a stuffed waffle iron, so of course we had to try it out. These are so very delicious, I had to share.

As I mentioned, the original recipe is based off of Nigella's Garlic & Parmesan waffles from her book, "At My Table". This is just a different take on the recipe, with a stuffing of red peppers and mozzarella.

Makes 3x 5''(12.7cm) waffles

A serving for me was 1 waffle, but my husband ate 2 easily, so scale up to fit your needs

Ingredients

For the waffle batter (Gluten Free)
  • 400g / 2 cups mashed potato (left over mash works well, or I used cooked frozen mash this time)
  • 4 tbsp (60ml) butter
  • 8 tbsp (120ml) milk
  • 2 eggs
  • 45g/ ~3/8cup finely grated Parmesan (or hard Italian cheese vegetarian equiv)
  • 4 tbsp cornflour
  • 1/2 tsp baking powder
  • 1 tsp Dried Rosemary (I like the grind it in a pestle and mortar or spice grinder to make it distribute better and release its flavour)
  • salt & pepper to taste
For the stuffing
  • half a ball of mozzarella (vegetarians check the packet to make sure you have a veggie version)
  • half a large red pepper (capsicum) - I use jarred roasted peppers (I hate the skin on fresh ones), but if you are using fresh you will need to fry the peppers off before use, unless you want crunchy almost raw pepper in your waffle - which is an option for a texture change.

Instructions

  1. Melt the butter (I microwave it for 30s then stir until completely melted, but you can do it in a saucepan) and leave to stand to cool down.
  2. Preheat the waffle iron.
  3. Prepare the filling by chopping the mozzarella and pepper into small pieces.
  4. Microwave your mash if using frozen or allow to come to room temp if using leftovers, and, using a fork or something similar, break up the mash so that it is light pieces, not one lump.
  5. In a large bowl whisk together the cooled butter, eggs and milk.
  6. Add in the potato a little at a time, whisking it in each time. I used a flat manual whisk, but you could use an electric hand whisk, or a bowl mixer if you prefer.
  7. Add the Parmesan, cornflour, baking powder, rosemary, salt and pepper and beat until smooth(ish).
  8. Lightly oil the waffle iron.
  9. Place a few spoonfuls of batter in the bottom of the waffle iron - enough to just cover the raised areas. After a couple of second it will begin to puff up a little.
  10. Take 1/3rd of the filling and place in the centre of the waffle batter, leaving half a cm or so around the edge.
  11. Carefully spoon batter over the filling, sealing it in and filling the waffle iron to a little over 3/4 full.
  12. Close the waffle iron, invert it, and cook for about 7 mins total or until golden brown - different waffle makers will vary. After 7min check the cook and let it go a little longer if necessary.
  13. Tip out of the waffle from the maker onto a plate (I discovered tipping was way easier than trying to lever it out with a spatula - just be careful not to burn yourself).
  14. If making lots, pop the cooked ones in a low oven until ready to eat.

Depending what meal we are making these for, they go well with eggs or some suitable veg on the side (I imagine garlic roasted tender stem broccoli would be amazing). A piquant sauce on the side is also a nice flavour combo (Sauce Shop Honey Chipotle BBQ sauce is what I had with mine where as Rob ate his without anything on the side).

Stuffed Potato and Parmesan Waffles on a grey plate, with a cheese pull.

This is a very versatile recipe, so if you don't like the amount of cheese or want to use a different herb/spice, just go ahead and play. It one to have fun with.

Check Out My Fiction YouTube Channel

Tales with Tasha - YouTube

Each week we have a theme and so there will be something for all tastes.
  • 🎤Micro stories and/or silly jokes as YouTube Shorts Monday - Sunday- for fun quick viewing
  • 🕮A longer story every now and then for story time, over coffee or before going to bed

Tasha's Social Media

📚Join My Newsletter📚


Receive 2 FREE eBooks just for signing up and a free short story once every month on Free Fiction Friday.


Two books covers - one with a woman firing guns above the title "Assassin's Blood" the other with a woman screaming and glowing with the title "Curse of a Banshee"

List hosted on MailChimp, information will only be used for Newsletter contact, and we do not send spam.

Saturday, 13 November 2021

Recipe: Cauliflower Cheese Soup - Perfect and delicious for a cold autumn or winter day. #Vegetarian

Recipe: Cauliflower Cheese Soup

Cauliflower Cheese Soup

This is a lovely, filling soup, comforting and warm with some deep wintery flavours. Now the first part of the recipe where we roast the cauli is optional, but it really enhances the flavour of the soup, so only skip it if you really don't have time. 

I made my soup using my Instant Pot Pro Crisp, which is an air fryer and a pressure cooker (I really wanted to try it out since it's new and I had only used the air fryer part once), but it is totally possible using an oven and a large saucepan.

As long as you check your stock, this recipe is gluten free and vegetarian. To make it vegan, swap out the cheddar cheese for a vegan alternative and maybe a bit of nutritional yeast to boost the flavour.

Ingredients

  • 1 large cauliflower
  • 2 tbsp olive oil
  • 1/2 tsp ground turmeric
  • 1 tsp ground paprika
  • salt and pepper to taste
  • 1 large onion
  • 2 cloves of garlic
  • 1 can (400ml/14oz) coconut milk
  • 1lt vegetable (or chicken if you don't mind it not being vegetarian) low sodium stock
  • 150g shredded mature cheddar
  • 1/2 tsp garlic powder (optional)

Instructions

  1. Cut the cauliflower into medium sized florets, then cut each in half.
  2. Mix the turmeric, paprika, salt and pepper in a small bowl.
  3. In a large bowl add 1tbsp olive oil to the cauliflower and make sure it is all coated, then add the mixed spices and toss until each floret is covered.
  4. Optional, but recommended - Roast the cauliflower: in the air fryer, place in the basket and roast at 200C (390F) for around 15 mins, giving it a shake at regular intervals, or until the edges of the cauli have browned nicely - in the oven, spread the cauli on a large baking sheet and pop it in at 220C (425F) and roast for 20 mins, turning the cauli ever 5 mins or so.
  5. Chop the onion into medium sized pieces.
  6. Sauté the onion: for an Instant Pot, press the saute option on high, for the hob, put a large saucepan over a med to high heat and add the other tbsp of olive oil with the onion. Cook the onion, stirring constantly until it is going golden, but not crisping on the edges.
  7. Bruise and add the garlic cloves and cook for another minute until it is fragrant.
  8. Add the cauliflower (if you would like, reserve some of the cauli as a garnish, but I totally forgot) to the pot and mix with the onion.
  9. Add the coconut milk and the stock and stir to combine.
  10. Cook until the onion is melting away and the cauli is so tender it is breaking up. Instant Pot - put on the lid, pressure cook for 10 min and do an instant pressure release. Hob - simmer for 15-20 mins.
  11. Taste the soup, add more seasoning if necessary, but remember the cheese will add salt. I also added some garlic powder at this point because pressure cooking can mute garlic flavour.
  12. Add the cheese to the pot and using a stick/immersion blender, blend the soup until it is smooth.
Serve with something crunchy sprinkled on top, or your reserved cauliflower as a garnish. Those little crunchy fake bacon bits would be really nice, or real crispy bacon, or croutons, or crunchy onions - the options are limitless.


Check Out My Fiction YouTube Channel

Tales with Tasha - YouTube

Each week we have a theme (this week is was vampires, next week it is creepypasta/urban legends) and so there will be something for all tastes.
  • 🎤Micro stories as YouTube Shorts Monday - Thursday - for fun quick viewing
  • 🕮A longer story every Friday - for story time, over coffee or before going to bed

📚Join My Newsletter📚


Receive 2 FREE eBooks just for signing up and a free short story on the first Friday of every month on Free Fiction Friday.


Two books covers - one with a woman firing guns above the title "Assassin's Blood" the other with a woman screaming and glowing with the title "Curse of a Banshee"

List hosted on MailChimp, information will only be used for Newsletter contact, and we do not send spam.

Image used in banner by Anna Nekrashevich from Pexels

Monday, 2 August 2021

Recipe - Delicious Focaccia with Perfect Texture

Recipe: Delicious Focaccia

Recipe: Delicious Focaccia

So I made a focaccia this weekend that was utterly delicious and a lovely chewy texture, so I thought I'd share the recipe. It is based on this one by Kitchen and Craft on Youtube, but I changed is up a little, so here is my version. This vid is very good for technique though, very, very useful for all new to making focaccia, so definitely watch it. You may also prefer their recipe.


Ingredients

  • 600g/4.5cups Strong Bread Flour
  • 1 sachet of fast action yeast (7g)
  • 450g warm water (38-39C / 100-105F this is approx blood temp, so if you don't have a thermometer, check it with your little finger, if it feels hot, it's too warm, if it feel cool it's too cold)
  • 3/4 tsp salt
  • 2 tbsp extra virgin olive oil

toppings - dried rosemary, garlic granules, sea salt granules

Equipment

  • 2 large bowls
  • 1 med bowl
  • large 35x26cm baking pan (~14x10 inches)

Method

  1. Put the flour in one of the large bowls and add the yeast and mix through, making a well in the centre.
  2. Put the warm water in the med bowl and add the salt, making sure it dissolves fully.
  3. Add the salt water to the well in the flour, then add the olive oil as well.
  4. Bring the flour and liquid together (I put a little bit of oil on my fingers so the dough doesn't cling completely to them) until it's homogenised.
  5. Grease the second large bowl and transfer the dough to it (a bench scraper/dough scraper is really useful for this, but use a spatula if you don't have one - best not to use a hand since the dough will be very sticky).
  6. For this bit, it is definitely a good idea to lightly grease our fingers with oil as well. Grab a chunk of dough (about a third) from the side and drag it up and over the top, tucking it onto the other side of the dough. Turn the bowl 1 quarter and do the same again. Repeat two or three more times.
  7. Cover the bowl with a damp cloth or cling film and leave for 20 mins.
  8. Repeat 6 and 7 four more times, or until the dough is smooth and shows resistance to touch.
  9. Cover the bowl tightly with cling film or something equivalent so that there is an air tight seal and put the dough in the fridge for a slow prove. Overnight is easiest. This is to develop extra flavour and gluten in the flour, since we aren't doing a big knead.
  10. In the morning, grease the baking pan and transfer the dough to it. Push it out to the edges of the pan with finger tips. Sometime the dough will resist because it is cold, cover it and leave it for 10 minutes if it won't stretch, then try again.
  11. Cover with cling film or a damp cloth and place in a warm place to prove for about an hour. (I put my oven on its lowest setting in advance and then turned it off when I placed the pan in it).
  12. Take the pan out and with wet fingers put dimples all down the dough, but be careful not to knock out all the air.
  13. Put the dough back in the warm place and let rise for another 45 mins or so before bringing it out. The dough should fill 1/2 to 2/3 of the tin and should look a little bubbly and wobbly. If the dough has not risen enough, find a slightly warmer place - my oven was too cool at the end and I heated it up a little bit, then put the dough back in for another 15 mins, which did the trick.
  14. Pre-heat the oven to 230C/450F.
  15. Now add the toppings - you can add what you like, I went with dried rosemary, and garlic granules with some sea salt, but go with whatever flavours you fancy. Just add a drizzle of extra virgin oil over the top.
  16. Bake the bread for 15-20 mins until golden. If you have a baking thermometer the internal temp of the bread should be ~88C/190°F.
  17. Transfer the bread to a wire rack to cool.
The bread is very nice dipped in oil or slathered in butter 😋.


📚Join My Newsletter📚


Receive 2 FREE eBooks just for signing up and a free short story on the first Friday of every month on Free Fiction Friday.


Two books covers - one with a woman firing guns above the title "Assassin's Blood" the other with a woman screaming and glowing with the title "Curse of a Banshee"

List hosted on MailChimp, information will only be used for Newsletter contact, and we do not send spam.

Banner Photo by Savi P from Pexels

Wednesday, 16 September 2020

Recipe: Set Chocolate Mousse #GlutenFree #EggFree

Recipe: Chocolate Mousse

Set Chocolate Mousse


This recipe is easy, delicious and very versatile. I made it last weekend for my family and it went down very well with everyone but my mother, but she doesn't like dark choc, so not really surprising. Might want to make the milk choc version for those with a sweeter tooth. Next time I plan to add a little orange liqueur to spice it up a bit.😋

The actual recipe comes from here: The Perfect Refuge an absolutely delightful Italian cooking channel on Youtube, but I use something of a different method, so I thought I would post it. This is the vid of the original recipe, and there is a second option using eggs as well - turn on the subtitles for English.


~15 slices (My father was the only one who managed to eat 2😂)

Ingredients

  • 250ml/1.05 cup cream (I used double, but I suspect single would be okay)
  • 40g/ 0.4 cup cocoa
  • 1 lt/4 cups milk
  • 150g dark (or milk) chocolate (3/4 cup of choc chips)
  • 70g/ 2/3 cup potato starch or corn flour (starch)
  • 60g/ 1/4 cup sugar (only need this is using dark choc - milk has plenty of sugar)

Equipment

  • 1 large mixing bowl, 1 medium one
  • scales/measuring cups/measuring jug
  • hand whisk
  • sieve
  • large saucepan
  • large rectangular dessert/terrine tin

Instructions

  1. Put the cocoa in the large bowl and slowly add the cream bit by bit using the whisk. You will end up with a thick paste.
  2. Add a splash of the milk to the paste to loosen it with the whisk, then keep adding and stirring until you've added about half the milk.
  3. In the medium bowl mix the corn flour/potato starch with the rest of the milk and whisk together.
  4. Add the corn flour/milk mixture into the cocoa mixture bit by bit using the whisk, making sure it combines well.
  5. Sieve the liquid into the large saucepan and push through any lumps remaining in the sieve. (I had just a few little ones).
  6. Heat gently on the hob and break in the chocolate.
  7. Stir continuously while the chocolate melts, then bring the mixture to the boil.
  8. Boil gently for 2 mins or until the mixture has thickened (took me more like 5, but I was heating it very gently because I fear the mixture splitting).
  9. Line the tin with cling film (if your mould is silicon, this step may be unnecessary, but it makes like a lot easier),
  10. Pour in the mixture and place more cling film over the top, in contact with the mixture.
  11. Place the dessert in the fridge for 5-6 hours min (I did mine overnight).
When you are ready to serve, remove the top cling film, turn it out onto a large platter, remove the rest of the cling film, and dust with a little cocoa. Slice with a sharp knife into individual portions. Serve will little crunchy biscuits for a bit more texture - it would be wonderful with amaretti.

It is really nice with a little more cream drizzled on if you like you desserts even richer.

Banner Photo by Ihor N on Unsplash

Tuesday, 9 June 2020

Recipe: Tangzhong Milk Bread - Delicious White Bread with a Great Shelf Life

Tangzhong Milk Bread

So I have been making this recipe for three weeks now and it is fabulous. This makes 2 loaves and it keeps for up to a week in an airtight container. That's if it lasts that long. However, it's a little tricky because it's a very sticky dough so I have a couple of tips.
  • Use a stand mixer or specialised dough mixer if possible - I use my Kitchen Aid with the dough hook attachment. If you need to do it by hand, oil is going to be your friend, because using flour with dry out the dough too much.
  • Handle the dough with oiled gloves or very oily hands.
  • Handle the dough on a well oiled surface or a non-stick silicon baking sheet - my lovely sister bought me a large silicon pasty mat for Christmas last year and it is so useful for this.
Not my image - but this is what it looks like - will swap this out when I remember to take a piccie!


Tangzhong Milk Bread


Ingredients

for the Tangzhong
  • 40g Strong White Bread Flour
  • 200ml/g 0.85 cups water

for the dough
  • 580g/ 4cups Strong White Bread Flour
  • 60g/ 1/4cup sugar
  • 12g/ 2 tsp salt
  • 10g/ 2.5 tsp dried yeast
  • 10g/ 2.5 tsp dried milk powder
  • 260g / 1cup + 2 tbsp milk
  • 1 large egg
  • 50g/ 1/2 stick unsalted butter (room temp)
for the glaze
  • 1 egg yolk
  • milk

Instructions

The Tangzhong - make in advance

Now I have seen recipes that call for this to me made the night before, 6 hrs before and 30 mins before, so it is up to you which you go for depending on what time you have.
  1. Place the flour and water into a shallow pan and heat gently, stirring all the time.
  2. Cook until the mixture is a thick paste.
  3. Transfer to a container and cover with cling film. Place in the fridge for 6hrs or over night, or place in the freezer for 30mins.
  4. Take out and allow to come to room temp before using.
The Bread
  1. Add the flour, sugar, salt, yeast and milk powder to the mixer bowl making sure not to let the salt and yeast come into direct contact.
  2. Mix the ingredients together to ensure proper distribution.
  3. Warm the milk in the microwave for 30s until it is luke warm to the touch.
  4. Add the egg and whisk together.
  5. Add the wet ingredients and the tangzhong to the dry and mix on low speed until the dough is beginning to come together.
  6. Add the butter to the dough and continue to mix on med until combined.
  7. Increase the mixer speed and knead for between 5-10 mins until the gluten is developed and the dough has come away from the sides of the mixer.
  8. Take the dough out and form into a ball by folding the sides under. (If you try this without oiled gloves or very oiled hands it will stick to you and you will never get it into a ball - trust me, this is what happened to me the first time).
  9. Place in an oiled bowl, cover in cling film and allow to rise for at least 45 mins to 1 hr depending on how warm it is. The dough is ready when you can put an oiled finger into it and it holds its shape. (I do this in my Instant Pot on the yoghurt setting - proves in 45 mins then).
  10. Turn out onto a non-stick surface and divide into six.
  11. Roll each into a ball and place under cling film for 15 mins.
  12. Lightly oil 2 2lb (9x5'') loaf pans.
  13. Take each ball and roll out into an oval using a non-stick rolling pin.
  14. Fold the top point of the oval over the middle and press down with the heel of your hand.
  15. Fold the bottom up over the middle and press down with the heel of our hand.
  16. Take one of the non-folded edges and press over like the first roll of a swiss roll and press the edge into the main dough with finger tips so it sticks.
  17. Roll up and seal the edge by pinching it, so you have a mini roll the approx width of the loaf pan and 1/3 the length (looks to be a similar shape to a pain au chocolat).
  18. Place in one end of the loaf pan.
  19. Repeat 13-18 until there are three rolls in each tin next to each other.
  20. Cover with cling film and allow to rise in a warm spot for 30 mins, until the dough is up to the top of the loaf pans.
  21. Pre-heat the over to 180C/355F
  22. Beat together an egg yolk and a little milk to form the glaze.
  23. Brush the tops of the loaves gently with the glaze.
  24. Bake for 25 mins - they will turn a lovely deep golden brown.
  25. Allow to cool on a wire rack.

This bread makes the most amazing eggy bread/egg flip or French toast. One small slice can suck up a whole egg! It is also delicious for sandwiches and toast.


The Sexy Stories Podcast 10


It's Tuesday, which means a new ep of my podcast Virginia Waytes' Sexy Stories. We are coming towards the end of season 1 of The Manor at the moment, and things are really getting exciting as well as very, very naughty!

Paranormal romance - adults only
The Manor s01e09
Daddy Issues: Vampire Wisdom & the Comfort of Friends


Tuesday, 19 May 2020

Recipe: Chocolate Chip Cake - no added refined sugar

Recipe: Chocolate Chip Cake


Chocolate Chip Cake - no added refined sugar


So as I have mentioned before, I am trying to cut down on the refined sugar in my diet, and hence I am baking with things like honey and maple syrup as sweeteners. This recipe uses maple syrup instead of the brown and white sugar it originally had, so it is not as cookie like as the original, but it is very yummy and the maple gives a wonderful flavour.

I also cut the ingredients by half, since there are only the two of us at home, and it was still more than enough for a family. Just double up if you would like the 24 pieces the original recipe promised.

This is best eaten with a beverage of choice and would be heavenly with a glass of milk, but goes equally well with tea or coffee.

You could also throw in some nuts or some dried fruit if that floats your boat.

Ingredients

  • 165g (1 1/3 cups) all purpose flour
  • 1tsp baking soda
  • 1 tbsp corn starch
  • 1/2 tsp salt
  • 85g (3/8 cup) unsalted butter
  • 140ml (~2/3 cup) maple syrup
  • 1 large egg
  • 1/2 tbsp vanilla extract
  • 100g (1 cup) dark chocolate chips

Instructions

  1. Preheat the over to 160C/325F
  2. Melt the butter in the microwave or in a pan and allow to cool slightly.
  3. Line a 4x8'' baking pan with baking parchment/grease-proof paper.
  4. Add the flour, baking soda, corn starch and salt and mix together in a bowl.
  5. Put the melted butter into a large bowl, add the maple syrup and mix together.
  6. Add the egg and vanilla to this mixture and whisk until it is light brown.
  7. Add the dry ingredients into the wet and combine.
  8. Stir in the chocolate chips.
  9. Put the mixture into the lined baking pan.
  10. Bake for between 25-30 mins depending on your oven until a tooth pick comes out clean.
This cake will keep up to a week in an airtight container and it gets better the second day.

And it's Tuesday!

That means it's Sexy Stories podcast day over at VirginiaWaytes.com. The Manor is taking a 1 week mid-season break, so I have sexy vampires for you on the podcast.

We have the podcast for all the naughty bits, and the eBook for all the plot and the naughty bits.
Forgotten Soul is one of my permanently free eBooks too, so win/win.

Monday, 4 May 2020

Recipe: Korean Steamed Eggs - #InstantPot & #StoveTop # Vegetarian #GlutenFree

Recipe: Korean Steamed Eggs

Korean Steamed Eggs 

#GlutenFree #Vegetarian


So I saw this recipe on Youtube in many different places and had to try it. I loved it, but my husband thinks it is the most horrible thing on the planet ðŸ˜‚. The texture is like a creme caramel, but it is hot and savoury instead of cold and sweet. It goes really, really nicely with a toasted bagel. Absolute heaven. And there are so many ways to change it up.

I forgot to take pictures, but I will try and remember next time. (I forgot the second time too - sorry - in my defence it was breakfast and I was hungry 😉).

The recipe below could easily feed 2 if having something with it, 1 if having it by itself. Nice and filling.

Ingredients

  • 2 eggs
  • 1/2 cup stock ( I used chicken, but a nice veggie stock would work brilliantly, or even just water)
  • salt and pepper to taste

Yep, really, that's all - see how herbs and spices could be added to change it up. Some recipes I found online call for finely chopped spring onion (green onion/scallion), but others said that was an optional extra. Ratio of eggs to stock is 1 egg to 1/4cup stock and just go up or down depending on how many it is for.

Variation I tried this morning (yes I wrote the post one day and posted it the next ðŸ˜‰) that I came up with while trying to get to sleep last night. So good.
  • 2 eggs
  • 1/2 cup water
  • 1 tsp low sodium soy sauce
  • 1/2 tsp toasted sesame oil
  • salt and pepper to taste

Instructions

  1. Beat the egg and stock together with a fork or a small whisk.
  2. Add the salt and pepper (or other spices of choice) and beat in.
  3. Pour through a sieve into a heat proof container suitable for steaming - I used a ceramic Camembert baking pot I have (and a deep individual pie dish this morning). Two smaller ramekins would also work if dividing the recipe for 2 people.
  4. Add the chopped onion if using at this point.
For the Instant Pot
  1. Put 1 cup of water in the bottom of the pot.
  2. Put in the pot of egg mixture on a trivet so it is not in the water.
  3. Put on the lid and make sure the valve is set to sealing.
  4. Use the steam option and put it on for 10 mins.
  5. When the beeper goes off, do a quick pressure release, remove the lid and serve.
For the stove
  1. Set up a deep pan with water in the bottom with a steam rack or something to keep the pot out of the water at the bottom.
  2. Cover the pot in cling film and place the pot on the stand in the pan.
  3. Put on a lid and bring to the boil.
  4. Steam for 15-20 mins until set.
This is a silky smooth egg dish that is a delight to eat. I eat it with a spoon straight from the pot. Nommy.

[Edit - sorry, forgot this earlier Banner Background Photo by Jakub Kapusnak on Unsplash]

Wednesday, 29 April 2020

Recipe: Rosemary and Parmesan Potato Waffles #Vegetarian #GlutenFree

Recipe: Rosemary and Parmesan Potato Waffles

If you are looking for today's AtoZ post - sorry, I will be getting to it later. The WittegenPress Website is playing silly whatsits for no reason I know about, so I am having to chase that around and my creativity is suffering. Never fear, I will write today's drabble, I just have to sort that out first.

Recipe: Rosemary and Parmesan Potato Waffles


So these are based off of Nigella's Garlic & Parmesan waffles from her book, "At My Table", but these have a flavour profile I like even more and made up on the spot, so I though it would be good to share them.

Yes I know Parmesan isn't vegetarian, but it is easy to find vegetarian equivalents - in fact that's what we usually use since it's a) cheaper & b) just as nice. We buy the pre-grated fresh Italian hard cheese from the supermarket.

They are absolutely delicious with eggs and maple syrup - and yes they are savoury waffles, but the salt and sweet is divine.

Makes 7 waffles (10cm x 12cm/ 4''x 4.7'') - 1 serving = 2 waffles, but they can be reheated later if there are too many.

Ingredients

  • 400g / 2 cups mashed potato (I had left over from the night before, but you could use defrosted frozen mash or make it fresh)
  • 4 tbsp (60ml) butter
  • 8 tbsp (120ml) milk
  • 2 eggs
  • 45g/ ~3/8cup finely grated Parmesan (or vegetarian equiv)
  • 4 tbsp cornflour
  • 1/2 tsp baking powder
  • 1 tsp Dried Rosemary (I like the grind it in a pestle and mortar or spice grinder to make it distribute better and release its flavour)
  • salt & pepper to taste

Instructions

  1. Melt the butter and leave to stand to cool down.
  2. Preheat the waffle iron.
  3. Using a fork or something similar, break up the mash so that it is light pieces, not one lump.
  4. In a large bowl whisk together the cooled butter, eggs and milk.
  5. Add in the potato a little at a time, whisking it in each time. I used a flat manual whisk, but you could use an electric hand whisk or a bowl mixer if you prefer.
  6. Add the Parmesan, cornflour, baking powder, rosemary and salt and pepper and beat until smooth(ish).
  7. Add about an ice cream scoop of batter to each side of the waffle iron if using a square one (ours is electric and looks like a sandwich maker) - if using a round one go with what you are used to and close. You'll soon know if you used too much because it will squidge out the sides ðŸ˜‚.
  8. Cook for about 7 mins total or until golden brown - different waffle makers will vary.
  9. If making lots, pop the cooked ones in a low oven until ready to eat.
As I mentioned above, these are lovely with eggs and a touch of maple syrup. They make a wonderful breakfast or brunch, but they would also go well with meats or as a side for a main meal as well.

The amounts of cheese and seasoning are all very handwavy - you can go with whatever you like best, but I was very pleased by the overall taste of these.

Enjoy! Stay safe.

Banner Background Photo by nabil boukala on Unsplash

Thursday, 5 March 2020

Recipe Recommendation: Black Bean Brownies (The Delicious Healthy Option) #GlutenFree

Recipe Rec - Black Bean Brownies (The Delicious Healthy Option)

Recipe Recommendation: Black Bean Brownies 

(The Delicious Healthy Option) #GlutenFree

So I have been making a conscious effort to improve my diet, because, frankly I used to eat far too much crap. One of the big things I am doing is reducing the amount of refined sugar I eat.

Now I have to admit, this was really hard for the first week. They are right that sugar is more addictive than cocaine - however, it seems withdrawal doesn't last that long ðŸ˜‚. I've been doing this since New Year and I find that I don't really crave the sweet things that often anymore.

However, I cannot live without chocolate. Sorry - never going to happen. And also, research says that dark chocolate has some great properties, so I have moved on to having some dark chocolate every day - the 72% or 85%, which are supposed to have all the good stuff in them.


I miss cake, though, so have been looking for alternatives. Now I have a new Instant Pot (which I will talk about more in later posts) and while looking for recipes for that I came across a website called iFOODreal run by a lovely lady called Olena Osipov which has some fabulous recipes on it. She also has a great Youtube channel.


One of these recipes is Black Bean Brownies - yes that is brownies made from black beans.

Good news for my gluten intolerant friends too - this recipe is gluten free.

Now I know what you're thinking, probably the same as I did - black beans? Really?

Well I made this recipe the other day and everyone loves it. They are delicious.


Word of warning - this is a very dark chocolate recipe, so if you're not into dark chocolate, this will not be for you. All the sweetness comes from fruit and there is no added refined sugar, so the brownies are dense, squidgy and wonderful with a cup of tea or coffee. They also get better with time IMHO, so if you can leave some overnight they improve even more.


If you want to see the whole recipe, and all the advice Olena gives, than check out her original post:
Black Bean Brownies.

I'm going to include the ingredients here because all the measurements are in North American style on iFOODreal, so here are the UK/Metric equivalents.

Ingredients

  • 400g tin of Black Beans
  • 2 large eggs
  • 155g unsweetened apple sauce (I looked up 1/2 cup and is said 125g, but I had a small 155g jar and it just about filled my 1/2 cup measure, so that's what I'm going with) - I think next time I will use the over-ripe banana idea though, because it's easier to get.
  • 15 small or 10-12 Medjool dates (I used the small ones)
  • the original recipe has 2 tbsp brewed coffee, but I threw in a tsp of instant coffee for a similar effect, since I didn't have brewed coffee on hand.
  • 1 tsp pure vanilla extract
  • 50g cacao or cocoa powder (cacao is better for you, but is not as easy to get)
  • 1/2 tsp baking powder
  • 1/4 tsp salt
  • 100g bag of extra dark chocolate chips (I used Dr Oetkers 72% choc chips) - 50g for inside, 50g for the top (this may not be quite the right amounts, but it made it easy for me😂).

Tips

  • A stick blender works well to blend the batter - my food processor is not overly great and I don't have a normal blender, so I used the stick one and it came out brilliantly.
  • Oven temp conversion (350F) - 180C or Gas Mark 4
  • I didn't have an 8x8 brownie tin so I used a 20cm/8inch sponge tin instead and just cut the brownies into cake style slices.
  • Cutting it into 16 might make the pieces look small, but they aren't - trust me - each piece is just enough.
  • I checked my brownies after 25min not 30 and they were perfect so I didn't use the final 5min of cooking time. It will depend on your oven.
  • Do not, and I repeat, do not skip the baking parchment lining. Because these don't use flour, they are not as robust as brownies can be, so getting them out of the tin was ... well ... entertaining. Without the baking paper I would have been sunk.
💖Yummy brownies that have things in them that are actually good for us - win/win! Don't forget to check out Olena's other delicious recipes and tips for hearty, healthy eating.💖

Do you have any favourite recipes that taste decadent, but are, in fact, surprisingly healthy? I would love to hear what they are.

Banner BG Photo by Alison Marras on Unsplash

Sunday, 19 January 2020

Recipe Recommendation - 3 Ingredient Banana Oatmeal Breakfast Cookies (#GlutenFree, #Vegan)


Recipe: Banana, Oat and Chocolate Chip Cookie

Recipe Recommendation

3 Ingredient Banana Oatmeal Breakfast Cookies

Gluten Free and Vegan

So Soph (my sister) was recommended this recipe on Youtube after she started looking up overnight oat recipes, but I was the first to try it. I made these yesterday morning and this morning because I had the bananas and the cookies keep well in the fridge or freeze and they disappear fast.

Many of the recipes I have seen for breakfast cookies require loads of honey or some other sugar substitute, but all the sweetness in these comes from the bananas. The riper the bananas the sweeter the cookies and more prevalent the banana flavour - so we can adjust how we like our cookies by how ripe our bananas are. Personally I like them relatively sweet, so my bananas were on the brown side.

Of course the chocolate has sugar in it, but we're not dumping in huge amounts of refined sugar at the cookie level, so it is much better for us.

There is no lie in the title, these cookies literally only have 3 ingredients (I've listed them out with measures to add in the metric measurements as well - the original recipe is in US measurements). 
  • 2 large Bananas
  • 1.5 cups / 135g Rolled Oats - I picked up gluten free porridge oats
  • 1/3 cup Dark Chocolate Chips (I just used a standard 100g packet of Dr Oetker 70% Extra Dark Chocolate Chunks - which is probably loads too much, but it works 😂 - use vegan chocolate chips if required)
I mean we could easily add other things if we wanted too like nuts or raisins or even a little spice, just as long as we don't add too much and loose all structural integrity of the cookies.

Word of warning - do not touch these when they first come out of the over unless you like being covered in chocolate! Leave them to cool completely before attempting to eat. ðŸ˜‚

Banana, oat and chocolate chip cookies on a cooling rack.
Waiting, waiting, waiting for them to cool!
This is the original recipe video from the Clean & Delicious Youtube channel - which has just about everything we need to know, but I've put a few tips below it, that I found most important along the way.


  1. For those who are metric 350F = ~180C = Gas Mark 4
  2. The only sweetness comes from the bananas so the riper they are the better IMHO.
  3. A fork is okay for squishing the bananas, but a potato masher is much faster ðŸ˜‚.
  4. Mix the oats and banana and then cover them (I bought some silicone stretch lids before Christmas and they are awesome for such things - no more cling film) and let them sit for 20mins or so, so the oats absorb the banana - gives a moister cookie and better structural integrity.
  5. I baked mine on the lower end at 15mins and they are moist and chewy.
  6. Try not to eat them all at the same time.😂😂😂
These are moist, delicious and filling. Could not recommend them enough. These are perfect for those of us trying to cut down on our chocolate bar consumption, but still find ourselves in need of a chocolate hit - and studies have suggested that dark chocolate is good for us too, so yay!

Thursday, 7 November 2019

Recipe: New Potato and Blue Cheese Tart with Broccoli Pastry #GlutenFree #Vegetarian

New Potato and Blue Cheese Tart with Broccoli Pasty

This is a new recipe I created based on the same premise as the Butternut and Goat's Cheese tart I posted the other week. It uses the same gluten free broccoli pastry, but I think this filling is even better. After all broccoli and blue cheese is a classic combination. ðŸ’–

Be warned, this is a very rich tart - not much is needed for a good meal, especially if adding a small salad on the side.

For the Broccoli "Pastry"

  • 600g/21oz broccoli florets - this is about 2 large heads of broccoli
  • 90g/0.9 cup ground almonds (1 cup would be fine ;))
  • 25g/0.25 cup grated parmesan type cheese - I used the pre-grated Italian hard cheese from Morrisons because it tastes the same and is vegetarian. Proper Parmesan cheese uses animal rennet and it therefore not vegetarian.
  • 3 large eggs
  • salt and freshly ground black pepper

For the Filling

  • 800g/28oz new potatoes - sliced - this is just over 2 cans, but you can use fresh ones if you prefer
  • 2 tbsp oil - whichever is your fav, I used olive
  • salt and black pepper
  • 9 large eggs 
  • 300g/ 1 1/5 cup ricotta (for me this is one packet and 1/5 - so you can always use another cream cheese for the last 1/5th cup if you happen to have some - I used Philadelphia to make up the weight)
  • grating of fresh nutmeg
  • 150g/5.3oz blue cheese I used a softer creamy one, but Stilton would be good too and you can add more if you like your cheese flavour stronger, this just happens to be 1 packet for me.

Instructions

  1. Make sure the broccoli florets are not too large before blitzing them in a food processor until very fine. Place in a large bowl. We need to blitz in small batches or we'll get lumps - I did it in 4.
  2. Add the ground almonds, parmesan substitute (or real Parmesan is you are not vegetarian) and 3 eggs and mix well - seasoning to personal preference with salt and black pepper.
  3. Preheat the oven to 200C/400F/Gas 6.
  4. Line 2 23cm/9in, 3 cm high pie tins with baking paper - the first I made the mistake of only lining the bottom - but make sure to line the sides too or it's really hard to get out, this time I used round pan liners which worked perfectly.
  5. Press half the broccoli dough into each pie tin, across the bottom and up the sides. Try to make sure it isn't too thick, but also be on the look out for holes! I used a firm spatula to do this and it worked really well.
  6. If your new potatoes are fresh, cook them until just tender. If they are canned, drain them. Then chop them into slices or cubes, whichever is your preference.
  7. Line a large baking sheet with baking paper and scatter the potatoes over it.
  8. Drizzle with 1 tbsp of oil and season with salt and pepper.
  9. Put the tart shells and potatoes in the oven and cook until the tart shells are going golden brown and the potatoes have picked up a little colour. This took me 35min, but the original recipe said 20min. If the edges of the tart start to go too dark before the bottom cooks - cover with foil.
  10. Put the ricotta and the 9 eggs in a medium bowl with salt and pepper (and any other seasoning you fancy) and whisk until smooth. A hand mixer is by far the easiest, but a balloon whisk will work with some elbow grease.
  11. Take the tart shells and potatoes from the oven and divide the potatoes between the two shells.
  12. Pour the ricotta and egg mixture into each tart.
  13. Grate over some fresh nutmeg.
  14. Break up the blue cheese and scatter over the top of each tart. 
  15. Put the tarts back in the oven and cook for 25-30 mins until the egg mixture is set and colouring at the edges.
  16. Remove from the oven and allow to stand for a few minutes, before using the baking paper lining to help pull the tarts free from their cases.
  17. If the very edges of the tart dough have gone too dark (it does catch quite easily) trim them off.
  18. Serve in generous slices, but not too generous unless people are very, very hungry.
We had this for dinner last night and it was delicious and we now have plenty in the fridge for a second meal too ðŸ˜‹. 
New Potato and Blue Cheese Tart with Broccoli Pastry

Thursday, 24 October 2019

Butternut and Goat's Cheese Tart with Broccoli "Pastry" - #GlutenFree #Vegetarian


Butternut and Goat's Cheese Tart with Broccoli "Pastry"

#GlutenFree #Vegetarian

This is based off a Donna Hay recipe from the Saturday Times which I believe comes from her book Week Light, which I am definitely adding to my Christmas list :).

First thing I have to say is this pastry is amazing and would work with other tarts too and I fully intend to try it with others. I am dying to have a go at using it with a quiche Loraine.

This recipe makes 2 tarts - but it keeps well in the fridge and has nothing in it which means re-heating would be an issue. I suspect it will freeze well too, but haven't tried that.

One warning - this took me over an hour and a half to make. I am quite slow in the kitchen what with having to sit down all the time, so you might be faster, but I started at 4ish and finished at past 5:30. Totally worth it though, and 1 tart would easily feed 3-4 people giving a whole second meal as well.

For the Broccoli "Pastry"

  • 600g/21oz broccoli florets - this is about 2 large heads of broccoli
  • 90g/0.9 cup ground almonds (1 cup would be fine ;))
  • 25g/0.25 cup grated parmesan type cheese - I used the pre-grated Italian hard cheese from Morrisons because it tastes the same and is vegetarian. Proper Parmesan cheese uses animal rennet and it therefore not vegetarian.
  • 3 large eggs
  • salt and freshly ground black pepper

For the Filling

  • 800g/28oz butternut squash - cubed - this is one largish squash
  • 2 tbsp oil - whichever is your fav, I used olive
  • salt and black pepper
  • 8 large eggs - this is 2 eggs more than the original recipe because my pie tins are bigger
  • 250g/ 1 cup ricotta
  • 16-20 sage leaves or other seasoning of choice - I liked the sage, but I think I will go with my Italian herb grinder as well next time for more zing.
  • 150g/5.3oz goats cheese (for me this was a whole packet which was about the size of 1.25 US sticks of butter) - I used a creamy Welsh goats cheese, which worked really well, but a more acidic one would probably work even better if you like the taste.

Instructions

  1. Make sure the broccoli florets are not too large before blitzing them in a food processor until very fine. Place in a large bowl. We need to blitz in small batches or we'll get lumps - I did it in 4.
  2. Add the ground almonds, parmesan substitute (or real Parmesan is you are not vegetarian) and eggs and mix well - seasoning to personal preference with salt and black pepper.
  3. Preheat the oven to 200C/400F/Gas 6.
  4. Line 2 23cm/9in, 3 cm high pie tins with baking paper - I made the mistake of only lining the bottom - but make sure to line the sides too or it's really hard to get out.
  5. Press half the broccoli dough into each pie tin, across the bottom and up the sides. I used a firm spatula to do this and it worked really well.
  6. Peel, de-seed and cube the butternut squash (the original recipe called for pumpkin, which I imagine would work really well too - but butternut was easier for me to deal with and available all year round).
  7. Line a large baking sheet with baking paper and scatter the squash over it.
  8. Drizzle with 1 tbsp of oil and season with salt and pepper.
  9. Put the tart shells and squash in the oven and cook until the tart shells are going golden brown and the squash is tender. This took me 35min, but the original recipe said 20min. If the edges of the tart start to go too dark before the bottom cooks - cover with foil.
  10. Put the ricotta and the 8 eggs in a medium bowl with salt and pepper (and any other seasoning you fancy - I am def going with some Italian herbs next time) and whisk until smooth. A hand mixer is by far the easiest, but a balloon whisk will work with some elbow grease.
  11. Take the tart shells and squash from the oven and divide the squash between the two shells.
  12. Put the sage leaves in a bowl and drizzle with the remaining oil, tossing to ensure coverage.
  13. Pour the ricotta and egg mixture into each tart.
  14. Break up the goats cheese and scatter over the top of each tart.
  15. Do the same with the oiled sage leaves.
  16. Put the tarts back in the oven and cook for 25-30 mins until the egg mixture is set and colouring at the edges.
  17. Remove from the oven and allow to stand for a few minutes, before using the baking paper lining to help pull the tarts free from their cases.
  18. If the very edges of the tart dough have gone too dark (it does catch quite easily) trim them off.
  19. Serve in generous slices - would probably work well with a French dressed salad to give a little acid contrast.
Let me know if you like the colour coding. I find my eye can skip steps and miss things sometimes in recipes, so I highlighted the equipment and ingredients as they are used.

Tuesday, 10 September 2019

Recipe Recommendation - Lentils and Goat's Cheese from BBC Food


Recipe Recommendation

Lentils and Goat's Cheese from BBC Food


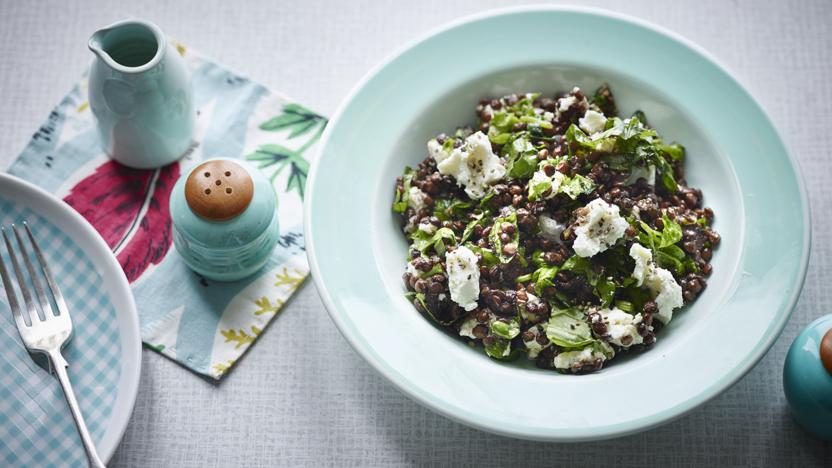
So I made this recipe of Lentils and Goat's Cheese last night for our dinner. Really simple, only 6 main ingredients + seasoning, most of which require little to no preparation.

It was delicious!

The flavour of the garlic, basil, lemon and olive oil against the earthly lentils and creamy goat's cheese are wonderful, and the perfect balance. Only 2 provisos edit - 3 provisos:

  1. It has to be a creamy goats cheese, not an acidic one - I think this is crucial, or the balance will be off.
  2. It is improved by something crunchy, otherwise it's quite one note on the texture scale.
    I did Rob a crispy Quorn fillet to go with his, and he said it set it off perfectly. I tried cashew nuts with mine (didn't think I could eat a whole Quorn fillet), but they weren't the right match. Might work really well with croutons, if you're not going for a gluten free meal.
  3. UPDATE 16-Sept-19 - a friend on Pillowfort recommended soaking the lentils before using them (I had mine soaking from first thing in the morning to when I made the dish the second time) and it really does improve it. The lentils are much easier to eat and sit better on the stomach for those not used to them. Soak, drain, cook in fresh water for 15-20 mins rather than 25.
This is the perfect midweek meal, especially for those looking for meatless alternatives that are filling, tasty and full of vitamins and minerals.

The only part that takes time is the cooking of the lentils and that's only 25 mins (at least mine were, according to the packet directions, but canned would probably be quicker). And it's more about leaving them on the stove and letting them bubble than anything more complicated. Everything else is shredded or squeezed by hand.

Thursday, 21 June 2018

Recipe: Chilli Chicken/Tofu with Spicy Beans & Tomato Sauce


Chilli Chicken/Tofu with Spicy Beans & Tomato Sauce

My apologies for not updating in a while - I have been busy with a project, but I am back today with a lovely recipe to share. It is actually a cross between two recipes that I am very fond of, Chicken Marsala (I haven't posted this one yet), which gave me the technique for doing the chicken and Turkey/Soya/Quorn Chilli with Tortilla Crust and Avocado Salsa for the beans and sauce.

Updated - I forgot to mention this works extremely well with smoked tofu, rather than chicken for the vegetarians among us - the flavour goes beautifully, and coating it in flour and frying it would give the little crunch too.

Serves 4 Cooking Time 45 min

Ingredients

  • 4 skinless chicken breasts or 1 packet of smoked Tofu (Tofoo is fantastic)
  • 3 tbsp regular flour (for gluten free, you could use another flour of your choice - it is only to help the browning)
  • Salt
  • Pepper
  • ½ tsp mild chili powder
  • ½ red onion
  • 1 skinned red pepper 
  • 500g box of passata
  • 1 tbsp chipotle (if you don't like it as spicy, reduce the amount)
  • 1 tsp ground cumin
  • 1 can red kidney beans
  • 1 can cannellini beans
  • ¼ cup sherry (optional)
  • 2 tbsp oil for frying
Rice or tortillas for serving, with soured cream and avocado salsa (optional).

Instructions

  1. Put flour, pepper, salt and mild chili powder in a bag and shake to mix. 
  2. Pound the chicken breast until they are about ¼ inch thick or Cut the tofu into four equal, flat pieces.
  3. Put the chicken or tofu in the bag and shake to coat with flour.
  4. In a large frying pan (30cm/12in) or flameproof casserole heat the oil and add the chicken/tofu. Cook until golden on both sides and just cooked - about 5-6 mins for chicken, less for tofu.
  5. Remove and set aside to rest in a warm place.
  6. Chop the onion finely.
  7. Sweat down in the same pan as the chicken was cooked in, over a low heat, until translucent.
  8. Chop the red pepper into bite sized pieces and add to the pan.
  9. Add the ground cumin and stir through - cook for 1 min.
  10. Stir in the passata and chipotle - rinse out the passata box/can with a little water and add that too.
  11. Add the beans and the sherry and bring to the boil.
  12. Cook until the sauce has thickened and is viscous - can take up to 10 mins, but use your judgement.
  13. Turn the heat down, add the chicken/tofu to the pan, including any juices that came out, pop on the lid and cook for 2-3 mins until the chicken/tofu is warmed through.
  14. Serve with rice or tortillas.
This is a very hearty meal with lots of things that are really good for us. It is also very tasty and the way the chicken comes out so juicy inside and slightly crunchy on the outside it just about perfect.

Tuesday, 15 May 2018

Recipe - Easy Poached Egg with Italian Spice Mix, Smoked Cheese and Avocado #vegetarian #glutenfree


Easy Poached Egg with Italian Spice Mix, Smoked Cheese and Avocado


So I just made this for my brunch (I forgot to have breakfast, so pushed the boat out to take in breakfast and lunch :)). I cannot poach an egg to save my life, but this method produces a wonderful facsimile with added extras. This recipe is only for 1, but it would be really easy to knock up a bunch of these in advance and pop them all in the water at the same time.

Cooking times are for a soft yolk - if you like yours firmer just up the cooking time.

The base recipe is vegetarian and gluten free.

Serves 1
Prep Time 2-4 mins Cooking Time 5-6 mins

Equipment

  • 1 ramekin or small bowl
  • cling film (plastic wrap)
  • bag sealing clip, or bulldog clip, or string for sealing the cling film
  • small mixing bowl
  • fork
  • saucepan
  • kitchen towel

Ingredients

  • 1 large egg
  • 2/3 slice of smoked cheese (approx 15g)
  • 1/4 medium avocado
  • Dried Italian herb and spice mix to taste (any or all of oregano, thyme, basil, garlic, chilli, rosemary, salt, dried onion - I have an Italian mix grinder which is perfect)
  • oil to prevent the egg sticking (you could use butter if you are feeling decadent :))

To Serve

  • toast/bun/salad/asparagus - just pick your favourite way of having poached eggs

Instructions

  1. 2/3rds fill your saucepan with water and set on the hob to boil.
  2. Separate the egg white into a bowl and set aside the yolk whole in half the shell (or pop it into a bowl if you don't mind the extra washing up :)).
  3. Cut the smoked cheese into small pieces (like thin grated cheese - you want it small enough to melt easily).
  4. Chop the avocado into small pieces (approx 4mm square)
  5. Mix the Italian herb and spice mix, the cheese and the avocado into the egg white using the fork.
  6. Take a sheet of cling film and use it to line the inside of the ramekin/small bowl, leaving the edges over the sides.
  7. Spray the inside of the cling film with oil (or brush it with oil if you don't have a spray).
  8. Pour half the egg white mixture into the lined ramekin.
  9. Carefully tip the whole egg yolk into middle.
  10. Pour the other half of the egg white mixture over the top of the yolk.
  11. Gather up the sides of the cling film and twist so the egg is held tightly, then seal with the clip or string.
  12. Turn down the boiling water to a brisk simmer and add the egg.
  13. Cook for 2.5 to 3 mins then use a fork in the loose tail of cling film to flip the package upside down and keep it there while it cooks for another 2.5 to 3 mins. (If I didn't do this, the top did not cook properly - when the time is up you can unwrap your egg carefully to check it is cooked to your liking, and if it's under done for you, re-wrap it and pop it back in).
  14. Take out the egg, dry on kitchen towel and unwrap it, before popping it on your toast/bun/salad, or however you like to eat your poached eggs.
In case my descriptions are confusing, here's the basic technique of poaching a plain egg in cling film thanks to Tesco Food on Youtube:

Tuesday, 1 May 2018

Recipe: Turkey/Soya/Quorn Chilli with Tortilla Crust and Avocado Salsa


Turkey/Soya/Quorn Chilli with Tortilla Crust and Avocado Salsa

Made this recipe for tea last night and it was very yummy. We usually have salad on a Monday in the spring and summer, but it was so wet and horrible, I did this instead.

It should feed four, but I can attest to the fact that one person can eat enough of it for 3 because I watched my lovely husband, Rob, do just that last night. He had missed lunch. I used Turkey mince, but this is the kind of recipe where the meat is just a carrier for flavour, so it will work just as well with soya mince or Quorn mince.

Adding more beans (haricot or cannellini beans would work well with the kidney beans) would also cheaply bulk it out for more people or for those with an appetite like Rob had last night :).

Gluten Free
  • This is also gluten free if you can get/make pure corn tortillas - I could only get corn and wheat tortillas in my supermarket, but pure corn ones are available online. 
  • Also, if using soya mince and going for gluten free, check it, because sometimes they add wheat flour.
This is based off of this recipe (Turkey Tortilla Pie from Good Food), but I've changed a few things (of course I did ;)), hence this is my version.

Feeds 4, Time 30-40 mins

Ingredients


Chilli
  • 1 tbsp oil (use your fav - it's for frying)
  • 2 red onions (you could use white onions if you like, I just prefer the sweeter red ones)
  • 1 large red pepper (I used a roasted/skinned one from a jar)
  • 1.5 tsp ground cumin
  • 450g mince (turkey/soya/quorn)
  • 1 tbsp chipoltle paste (this makes it a decently warn chilli but not mouth on fire stuff, if you prefer it milder, reduce the amount)
  • 500g passata
  • 400g kidney beans (1 can)
  • 200g sweetcorn (1 can)
  • 2 corn tortillas (you can use wheat if it's all you can get, but the corn ones add a nice sweetness and allow for a gluten free meal if they are pure corn)
  • sprinkling of grated cheedar cheese
Salsa
  • 1 large rip avocado
  • juice 1/2 lime
  • dried garlic to taste (either granules or a garlic grinder)
To serve (optional)
  • soured cream
Equipment
  • flame proof casserole dish
    or large frying pan + casserole dish
  • small bowl

Method

  1. Finely chop the onions.
  2. Add the oil to either your flame proof casserole or the frying pan and put on a low heat on the hob.
  3. Add the onions and cover - allow to sweat down until soft. This can take up to 10 mins - the onions should be translucent when done.
  4. Dice the red pepper and add to the pan.
  5. Add the mince and stir thoroughly.
  6. Cook for 5 mins or so until the mince is browned - the time will vary depending on what mince you are using, so use your own judgement.
  7. Stir in the chipotle.
  8. Add the passata, then rinse out the can/box with a little water and add that as well.
  9. Bring to a boil and simmer for 5 mins or so.
  10. Add the kidney beans and the sweetcorn and cook until the chilli is thick and viscous, not watery.
  11. While the chilli is cooking, dice the avocado into small cubes.
  12. Place in a small bowl and squeeze over the half a lime.
  13. Sprinkle with the dried garlic to your own taste and mix.
  14. If you were cooking in a frying pan, once it is done transfer the chilli to your casserole dish.
  15. Put the grill on full power.
  16. Cut the corn tortillas into 8 triangles each.
  17. Place the tortilla triangles all over the top of the chilli like a lid.
  18. Sprinkle lightly with cheese.
  19. Place under the grill until the cheese melts and the edges of the tortilla's crisp up.
  20. Serve in bowls with the salsa sprinkled over the top and a dollop of soured cream if that is your thing.
This is a very tasty, hearty meal and it definitely going in my regular use folder.