So my darling twin decided in her infinite wisdom that for Christmas this year we would make all our friends scarves. I can reveal this now because we had our annual party last weekend and, as a group, most of us opened our gifts from each other, so that cat is already out of the bag. Since I am not revealing specific details, those who didn't open their pressies are still safe :).
Now Soph has a knack for crochet, where as I totally suck at it! I cannot crochet to save my life, please mourn with me a while ;). Hence Soph made the scarves and I had finishing off and tassel duty. These skills I am now a master at. Since I had absolutely no idea how to add tassels to a crocheted scarf before I started, I thought it might be fun to share the technique.
You will need:
Wool
Something stiff the length of your tassels like card or a DVD case
A crochet hook, or other hooking device suitable for using with wool
1. Cut Your Wool to Length
The easiest way to do this is to find a piece of thick card, a book or a DVD or something which is the same length as you want your tassels. Make sure it is tough enough not to bend.
Wind your wool around your frame the number of lengths you need for your tassels. (I found 6 lengths was a good number for each tassel, because each length of wool gives you 2 strands in your tassel - of course it will depend on the thickness of your wool).
Cut your wool along the edge where the first length began.
Now you have all your wool for making your tassels.
2. Fold Your Tassel
Since each length of wool makes 2 strands in your tassels you need to fold them all in half.
First of all take 6 strands and make sure the ends lines up.
Fold all strands in half, lining up to the shortest length (your lengths will all be about the same length, but there is usually a margin or error).
Now you need to thread you tassel onto your crochet.
Choose which edge stitch you wish to attach it to - a tassel every 2 stitches works well with double ply wool.
Push your crochet hook through the stitch.
Out the fold of the tassel over the crochet hook and hold taut.
Pull the tassel back through the stitch. The secret is to keep it taut all the time so threads do not fall off. If they do, rehook them and pull them through.
4. Finish Your Tassel
The last part is very easy, to complete your tassel.
Make the loop you have pulled through the crochet large enough to get your thumb and forefinger through - if the tassel is too small use the crochet hook for this bit, but it's fiddlier.
Pull the long strands of the tassel through the loop.
Gently pull taut, so the loop closes around the strands.
And there you have it, the easiest way to do a simple tassel. It works for small ones, huge ones and everything in between.
So, I might be into band looming :D - but I would like to point out I discovered it over a year ago before every other ten year old did as well! It's fun and I especially like the little critters you can make.
I played around with several Youtube tutorials and I was looking for a Cthulhu pattern, but I couldn't find one, so I created one myself.
The design is based off this Iron Man one by PG's Loomacy, so if you want to see how most of the looping works in action, go watch the video:
I don't have a video camera and all you'd see if I did was me pinging bands all over the place and swearing, so it's probably better that I do this with images :).
You will need:
~200 body colour bands (I used a random selection of turquoise, green and bright green)
4 black bands
2 red bands
1 loom (2 if you are doing the larger wings)
1 hook
something like tooth picks for loop holding - I use the little plastic hooks that come with some packets of loom bands
Arms
click to enlarge
For each arm you need 17 bands and you need to make 2.
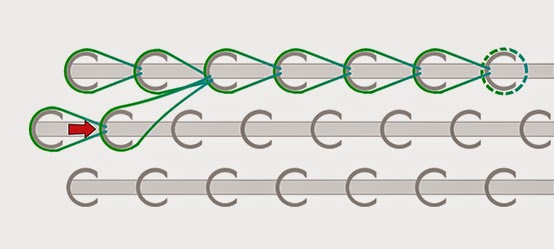
The loom shown is a Rainbow loom - hence the little red arrow. If you do not have a little red arrow just make sure the openings in your pegs are pointing down.
First layout the bands as shown. All band are double bands (2 bands) unless otherwise stated (e.g. 3bs means 3 bands). The green numbers show what order to lay the bands, starting at 1 and working up.
The cap band on the bottom peg goes on last and needs to be wrapped around the peg 3 times.
Now loop following the red arrows in the order of the black numbers (you know you have looped the correct bands when you see the tear drop shape).
Remove the arm from the loom, placing a cocktail stick/spare hook through the top two loops to keep them secure and set aside.
This is what is should look like when looped.
Feet
For each foot you will need 6 bands.
Layout the bands as shown following the green numbers (double bands unless otherwise stated).
The cap band goes on last and needs to be wrapped around the peg 3 times.
Loop following the red arrows and the black numbering.
Remove from loom and leave to the side (you can use cocktail sticks to secure the open loops or just be very careful not to pull them out.
Main Body Layout
Be careful if you are looking at the original video, this is where the design starts to differ in places.
click to enlarge
You will need 77 body coloured bands for this part of the layout.
Place the bands on the loom in the order indicated by the green numbers in the diagram (all double bands unless otherwise stated).
Place the feet on the last pegs to act as cap bands.
The design differs from the video design in that:
there is no neck,
the legs are longer
the legs are all 3 bands
Eyes
The eyes act as one of the horizontal bands for shaping the head.
You need 1 body coloured band, 2 iris coloured bands and 4 'whites' coloured bands (I used red and black).
These are a little fiddly because you have to twist each band onto the hook three times to make four loops one after another, so they are all on the hook at the same time in the order shown.
Then you put the body coloured band on the end of your hook, stretch it, and work all the twisted bands onto it so you get the diagram above.
click to enlarge
Now place the eyes on the loom as shown in the diagram.
Take one end of the body coloured band and put to on the right peg shown.
Take the other end of the body coloured band and put it on the left peg.
Push two black and one red band to the right and two black and one red band to the left.
Use your hook to catch one strand of the band between the two eyes.
Hook this over the central peg so that it keeps the two eyes separate.
Tentacles
The tentacles are a set of simple chains. To make a chain you use the following technique:
click to enlarge
click to enlarge
You need six simple chains ranging in length from between 3 and 5 bands. Which lengths you use is up to you. Depending on what you choose you will need between 19 and 31 bands for this section.
Once you have made the 6 chains, slip them all onto your hook.
Put one band on the end of your hook and stretch it.
Slide all your chains onto the single band similar to the diagram (only you'll have 6 not 3).
click to enlarge
Now place the tentacles on the loom as show in the diagram.
Take one end of the single band and push it onto the right peg shown.
Take the other end of the single band and push it onto the left peg shown.
Placing the Arms
This is kind of complicated - I would suggest you go watch the video and skip to 14:20 to see exactly how it's done.
Slide one arm off its holding stick.
Take hold of each end of one of the double free loops.
Push one end on the shoulder peg and one end on the next peg down.
Take hold of each end of the other double free loops.
Push one end on the shoulder peg and one end on the next peg down.
Repeat on the other side of the loom.
Horizontal Body Bands
click to enlarge
You need three horizontal body bands.
Place one single band in a triangle over the first three pegs after the shoulders (i.e. the outside pegs are the bottom of the arms).
Take one band and double it as follows: twist into a figure 8 fold in half hold both loops and stretch over the next three pegs
Repeat step 2 and place the band over the next three pegs as shown.
This will give you a wider chest going to abs.
Your loom should end up looking like this:
click to enlarge
Looping
Loop the Legs
click to enlarge
This is the easy part - loop the legs following the arrows and the black numbers.
Loop the Torso
click to enlarge
Now this is pretty straight forwards except for two things:
When you get to the pegs where the arms are, make sure you are collecting only the bottom bands for looping. These will be the underlying bands that you placed first.
Make sure you loop to the central peg for 10, 11 and 12 in the right order.
Loop the Head
click to enlarge
Now comes the tricky part.
The middle peg is the hardest because it has so many bands on it. DO NOT pick up any of the bands looped to it when looping the head bands.
Make sure you loop the chin in the correct order - start with the top two of the bands you need to loop - these should loop to the left (check for the tear drop shape).
Then pick up the next 2 and loop them to the right.
Finally loop the centre bands up - BUT - DO NOT loop over the tentacles. When you have looped 1 and 2 carefully lift the tentacles over the peg below (i.e. the neck peg), then loop band 3, then put the tentacles back.
Continue to loop following the arrows and the numbers - MAKE SURE to loop the centre top bands last because this gives him a nice brow ridge.
Take off the Loom
To prevent it all falling apart when you remove it from the loom you need a securing band.
Push your hook through the space in the top peg so you can see it beneath all the bands on the peg.
Take one single band and use your hook to pull it up through all the bands on the peg.
Put both ends of the band on the hook.
Pull the end closest to your hand over the other end of the band and off the hook.
Slide the remaining end from the hook onto your finger and pull tight (you should have a single slip knot).
With the loop still on your finger remove Cthulhu from the loom.
Make sure the securing band is pulled as tight as you can without breaking it and then use your hook to hide it under some of the other bands in the project.
Wings
If you do not have two looms you can link together, just leave out one of the two middle rows. His wings won't be as wide, but don't worry.
click to enlarge
You will need 39 bands for each wing.
Layout double bands as shown in the diagram following the numbering scheme. (As long as you lay the horizontal band on the top middle pegs first and the diagonal bands on the top outside pegs after that it doesn't matter which column of bands you lay in which order only that you start from the top and work down).
click to enlarge
Add a horizontal band across the 4 pegs under the top 4 pegs as shown. Repeat for the 4 pegs below that and the 4 pegs below them (3 bands total).
Add a single cap band to each column, twisted only once to form two loops.
click to enlarge
You'll be glad to hear looping the wings is easy.
Simply start from the bottom and loop up each column. I've numbered them in the diagram, but you can loop them in any order.
The only three that really need to be looped in a specific order other than bottom up, are 16, 17 and 18.
Once it is looped put a securing band through the bands on the last peg to which you looped as you did with the main body and remove the wing from the loom.
Make a second wing.
Attaching the Wings to the Body
Sorry for the awful drawing in this one ;)
First of all attach a second securing band somewhere on the same edge of each wing as the original securing band. See my terrible drawing as an illustration.
You do this by sticking your hook through an available loop, drawing a single band through then looping one end of it over the other and pulling tight.
Once you have your two loops on each wing it's time to attach them to Cthulhu.
Push your hook from the front through Cthulhu at about shoulder level to right or left of the body.
Hook the top securing band on one wing and pull it back through the body.
Push your hook through the body just below where you did before, from the back this time.
Pull the band back through.
Loop the free end of the band over the wing which will secure it.
Repeat all steps for the second securing band a little further down the body.
Do the same for the second wing so it matches the first on the other side of the back.
Ta da - you should now have a Cthulhu :). All hail the elder gods.
If you are looking for today's AtoZChallenge post, scroll down one :) (and thanks for visiting).
My dear Mama loves lamps. It is safe to say she has a bit of a lamp problem, but we've found a solution. Custom lampshades mean she's not filling the house with lamps any more, just changing boring old lampshades to new ones :).
We found this lovely lady on Etsy who makes lovely lampshades, her store is called ArthouseAttic. She does other custom furniture as well.
Now Mummy currently has three of her lamps and wanted another one to match one she already has. So I emailed ArthouseAttic to see if a commission was possible. Unfortunately it wasn't. Hence it was decided that I should try my hand at custom lampshades :).
An old lamp was found in the local hospice charity shop along with various items of silver jewellery and then I raided the local fabric shop for net, ribbon and trims. Yesterday afternoon I then set to work and this lunch time (I had to stop yesterday because I ran out of ribbon and trim) I finished it.
I can post it here with impunity knowing Mummy will not see it because she is something of a technophobe :)
I have come to the conclusion that I love my hot melt glue gun and sewing net onto a lampshade frame is a pain in the proverbial :)
So I made my darling twin a little puzzle for Christmas to take advantage of her new obsession that I managed to pass along to her :). I made her a Loki scramble square as pictured below and I thought I'd share how I did it in case you're all feeling creative too.
If you would like to make the same one you can download the image below, just by clicking on it to see it full size. Otherwise you can use it as a pattern. It's based on the tropical frog Scramble Square pattern and I can promise it's hard to do because we had four people try it yesterday afternoon and no one could do it :).
To Make Your Base Image
Image 1
To make the base image you need 4 images of your chosen theme. I had 4 pictures of Loki, you could use kittens or puppies or Thor or anything else cute that takes your fancy :).
Cut these out in an image program so they have a transparent back ground and then add in guide lines underneath somewhere around the centre of each image (see image 1 - this is to help with placement).
Image 2
As a base you need an image divided up into nine equal parts and I had black lines around the edge and across the centre to mark out the divides and help with the cutting (Image 2). Your edge black should be half the width of the dividing black lines which will be split in half on cutting of the puzzle. You want them to all end up equal so there are no give aways as to what is edge and what is join.
You don't have to have these, you can just make the image slightly bigger and have markers to show where to cut around the edge if you prefer (in this case you would need a precision cutting implement). (I have an Adobe Photoshop file here for those who have the program blank.psd).
Image 3
Next add in guide lines down the centre of each square - this is for image placement (Image 3). If your editing program doesn't have guides, just use a new layer and draw in lines - you can remove them before printing.
Image 4
Now take your first theme image and place it on one of the squares using the guide lines on the image and on the background. The vertical guide line on your theme image must line up with the centre blue guide line and the horizontal guide line should line up with the black line on the edge you are crossing (Image 4).
Make sure your images are above the black lines so that they will meet over the edge of the pieces. Repeat with your first theme image to form the same pattern as on the Loki scramble square above, rotating the image where necessary.
Repeat this for your other three images as well. Always make sure to use the guidelines or it will be obvious which images line up with which.
Image 5
Go through and edit the individual theme images to remove the guide lines as in image 5 to the left.
You can leave the background blank, but I think it looks much more interesting if you have something behind the images. To do this, create a square of whatever background you would like just big enough to fit on one of the nine pieces. Then place one of each of these backgrounds on each piece underneath all other parts of the image, remembering to rotate it every now and then so there is no particular way up to it. You should end up with something like the complete Loki scramble square shown at the top.
Turn off the blue guidelines.
How to Make the Puzzle
You will need:
1 A4 (or local equivalent) print of your base image
1 A4 (or local equivalent) piece of black card
paper glue (photo mount is best - it must be strong and must not cause wrinkles)
1 A4 (or local equivalent) laminating pouch
laminator (my laminator is a hot one, I have no idea if cold laminators adhere in the same way)
scissors (or accurate guillotine or craft knife and ruler)
How to go about construction:
Print out your image with the fit to paper option.
Glue your print out onto your card and leave to dry completely (our photo mount suggested 24hr)
Place the construct into a laminating pouch and laminate it.
Being incredibly careful cut along the dividing lines and around the edges making sure not to leave any obvious imperfections.
Congratulations, your puzzle is complete. Because the laminating pouch adheres to the paper and card you now have a nicely plasticised surface on the top and bottom of your pieces to prevent damage. If your glue is not durable enough your image and your card might come apart at this point, hence the need for good glue.
Now all you have to do is give the puzzle to someone and watch them stare at it for hours or try it yourself :).
So I made something the other week (with some help from my husband who is very handy with a spray can and an extra set of hands).
I used this youtube vid tutorial as a basis, but did things a little differently in places.
The gem is an emergency light and whistle covered in string, spray painted and then shoved up the backside of two clear halves of an alien egg toy (they were a quid in Range), glued together (I used seriously strong super glue and left to dry for 24hrs rather than hot glue for this), coloured in with a blue sharpie and then Dremeled off at the end.
The rod is a broomstick handle (£2.49 in Range), cut to length and then covered in construction foam (£1 a sheet from Range - only needed one large one) and masking tape just like the video says. I couldn't get 1/4inch construction foam, so I used a bedding roll mat (£3.49 again from Range). I didn't hand paint though like it says in the vid, I used craft spray paint (the most expensive part of the build at £5 a can).
The blade is mostly done the same way as the tutorial using foam board and hot glue, but again I spray painted it. Hence I didn't attach the blade until after everything was painted, rather than painting it in one.
The masking tape you can see on the blade is because I could only get A3 foam board at a reasonable price (on offer from Amazon) so I had to join two pieces together. I did this with cocktail stick stubs, hot glue and a bit of tape to make sure it couldn't come apart.
It was a lot of fun, but two pairs of hands make it a lot easier some times and it takes a very steady hand for trimming the blade so the edges look sharp, so having someone else to help is really useful.
Please excuse me while I go take over the world ;).